3.1. Examples
Further examples, both for the cloud and for downloading and local development, are included in the voraus.pioneer Examples documentation.
3.1.1. Tutorial: How to integrate a SensoPart camera with Python
Introduction
This tutorial will demonstrate how a SensoPart V20 camera manufactured by SensoPart Industriesensorik GmbH can be integrated using Python. The SensoPart cameras communicate using the TCP/IP protocol. Once a job is configured on the camera, it can be triggered via TCP/IP.
To configure a SensoPart camera, additional software is necessary. Please refer to the Useful links section for the software and its documentation.
Getting Started
Useful links
Requirements
Download the VISOR software.
Connect the SensoPart camera to your computer and open the VISOR software to configure the camera according to the documentation.
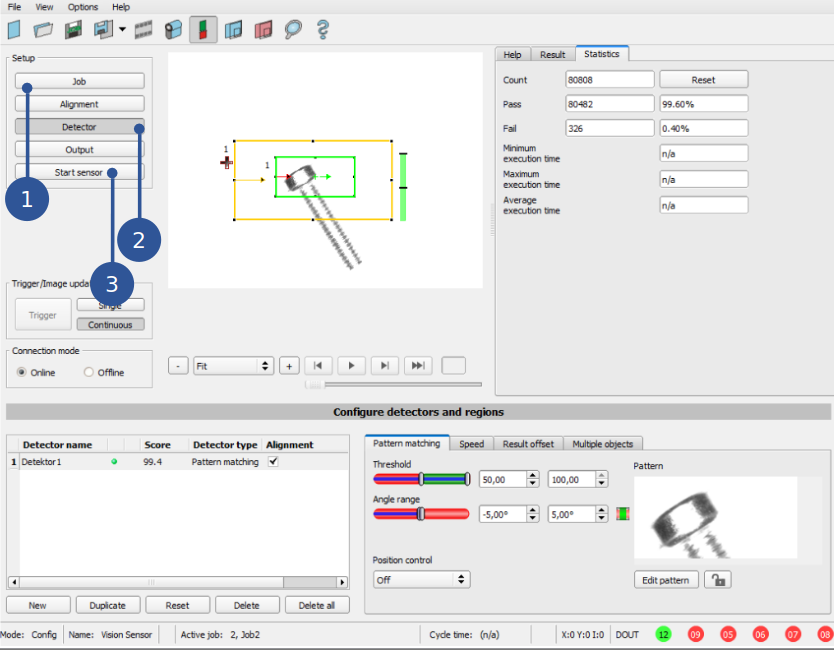
Configure the job (Fig. 57/➊) of the camera using your preferred detector (Fig. 57/➋) according to the documentation.
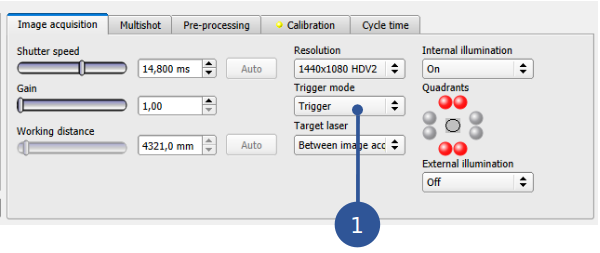
Set the trigger mode to “Trigger” like shown in Fig. 58/➊
Implementation Steps
Configuring the data output
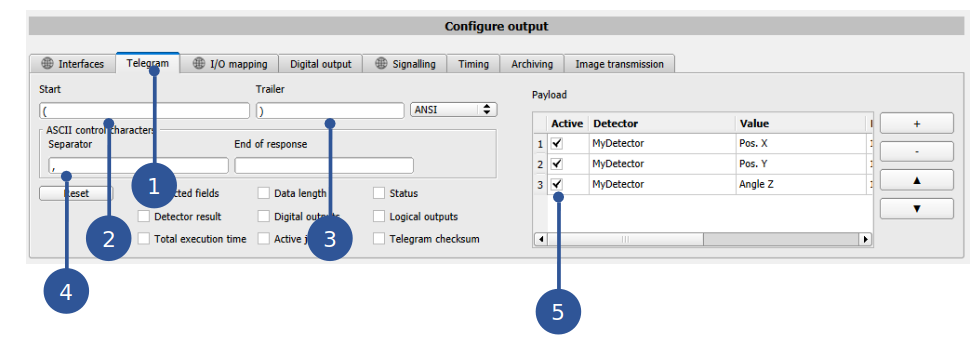
Once the job is properly configured, open the Telegram tab (Fig. 59/➊). In this tab, the data output can be configured.
Set the Start identifier (Fig. 59/➋) to “(” and the Trailer identifier (Fig. 59/➌) to “)”.
Set the Separator (Fig. 59/➍) to “,”.
In the payload on the right side, tick the boxes for the Pos. X, Pos. Y and Angle Z (Fig. 59/➎).
Please refer to the VISOR Software documentation for further information on how to configure the data output.
If everything is properly configured (see Fig. 59), click on Start sensor (Fig. 57/➌) to upload the job to the connected camera. Afterwards the camera can be disconnected from your computer and be moved somewhere else.
Writing a Python TCP/IP client for the camera
The code section below (Basic SensoPart Python class) provides a client implementation to communicate with a SensoPart camera via TCP/IP. The main functionalities include establishing a connection, triggering a job, and retrieving the results.
 1import socket
 2import string
 3
 4
 5class V20:
 6    def __init__(self, device_host: string, device_port: int = 6001, timeout: int = 10):
 7        """Initialize the client for the sensopart TCP socket.
 8
 9        Args:
10            device_host: IP of the host.
11            device_port: Port of the host. Defaults to 6001.
12            timeout: For a non-zero value all subsequent socket operations will raise if the timeout value has
13                elapsed before the operation has completed. If zero is given, the socket is put in non-blocking
14                mode. Defaults to 10 seconds.
15        """
16        self.device_host = device_host
17        self.device_port = device_port
18        self.timeout = timeout
19        self.is_connected = False
20        self._attempt_connection_if_necessary()
21
22    def _connect(self) -> None:
23        # Create a socket object (IPv4 address and TCP protocol)
24        try:
25            self.client_socket.connect((self.device_host, self.device_port))
26            self.is_connected = True
27            print(
28                f"Connection to the TCP socket {self.device_host}:{self.device_port} was successful!"
29            )
30        except socket.error as exc:
31            print(f"Failed to establish connection with the Sensopart camera: {exc}")
32
33    def disconnect(self):
34        self.client_socket.close()
35
36    def _attempt_connection_if_necessary(self):
37        if not self.is_connected:
38            # Socket needs to be reopened, cannot attempt connect twice
39            self.client_socket = socket.socket(socket.AF_INET, socket.SOCK_STREAM)
40            self.client_socket.settimeout(self.timeout)
41            self._connect()
42
43    def trigger_job(self):
44        self._attempt_connection_if_necessary()
45        try:
46            # Send the "trigger" command
47            trigger_command = "TRG"
48            self.client_socket.sendall(trigger_command.encode("utf-8"))
49
50        except socket.error as exc:
51            print("Error in trigger_job(): ", exc)
52
53    def read_results(self):
54        self._attempt_connection_if_necessary()
55        try:
56            response = ""
57            while ")" not in response:
58                # Receive a chunk of data
59                chunk = self.client_socket.recv(1).decode("ascii")
60
61                response += chunk
62
63            # Check if the received response is valid
64            # if ")" in response and any(val != "0" for val in response.strip("()").split(",")):
65            # Extract values from the response string
66            object_pos = response.strip("()").split(",")
67
68            # Convert values to floats and rename variables
69            x_pos, y_pos, z_rot = map(lambda v: float(v) / 1000, object_pos)
70
71            # Print values with units
72            print(f"x_pos: {x_pos:.3f} mm, y_pos: {y_pos:.3f} mm, z_rot: {z_rot:.3f}°")
73
74            return x_pos, y_pos, z_rot
75
76        except socket.error as exc:
77            print("Error in read_results(): ", exc)
78            raise exc
Line 5: This class contains the TCP/IP client for the SensoPart camera.
Line 6: The __init__ constructor initializes the client with the provided device host, port, and timeout settings. The initialization is executed automatically when an instance of the class is created.
Line 22: This private method establishes a connection to the SensoPart camera.
Line 33: This method closes the connection to the SensoPart camera. This is especially useful since most cameras only allow to be accessed by one resource at the time. If the connection is not closed properly, the user might need to restart the camera before they can reestablish a connection.
Line 36: This method checks if a connection is established and attempts to connect if not. Useful to avoid redundant connection attempts.
Line 43: This method triggers a job on the SensoPart camera.
Line 53: This method reads the results of a job triggered on the SensoPart camera. The response syntax has been configured in Configuring the data output before. It continuously receives data until it encounters a closing parenthesis “)”. It then parses the received data, extracts the object’s position values, converts them to floating-point values in millimeters and degrees, and prints them with units. Upon successful execution, it returns a tuple containing the object’s x and y position and z rotation.
If any errors occur during the connection process or while reading results, error messages are printed and exceptions are raised.
The following code section gives an example on how to use the V20 class during runtime:
#Establish connection
client = V20(device_host = "192.168.100.100", device_port = 2006)

client.trigger_job()

(x_pos, y_pos, z_rot) = client.read_results()

print(f"Pose of detected object: x:{x_pos}mm, y:{y_pos}mm, z:{z_rot}°")

client.disconnect()
Troubleshooting
3.1.2. Tutorial: How to integrate a SensoPart camera with the voraus.operator
Introduction
In Tutorial: How to integrate a SensoPart camera with Python you learned how to communicate with a SensoPart V20 camera manufactured by SensoPart Industriesensorik GmbH using Python. This tutorial will demonstrate how the previously written Python code can be integrated directly into a new program with the voraus.operator.
Getting Started
Note
The SensoPart camera used for this tutorial was configured with the IP address 192.168.100.200. The port 2006 was used for the request channel and the port 2005 for the response channel. This might be different for your setup, depending on your camera network settings. Just replace these values in the tutorial according to your needs. It is also possible to configure the SensoPart camera in a way that one port is used for both channels. Please refer to the documentation mentioned in Tutorial: How to integrate a SensoPart camera with Python.
Requirements
A running voraus.core with the voraus.operator. Follow the installation instructions of your voraus.core version in voraus.core.
You followed the Tutorial: How to integrate a SensoPart camera with Python. Especially the configuration of the SensoPart camera with the VISOR software was already successful.
You already know the basics of how to use the voraus.operator, e.g. how to create a new program and how to add commands.
Implementation Steps
Create and load a new program in the voraus.operator called “SensoPart Integration Example”.
- For the first command, add a Python code block containing the base class for the camera communication.
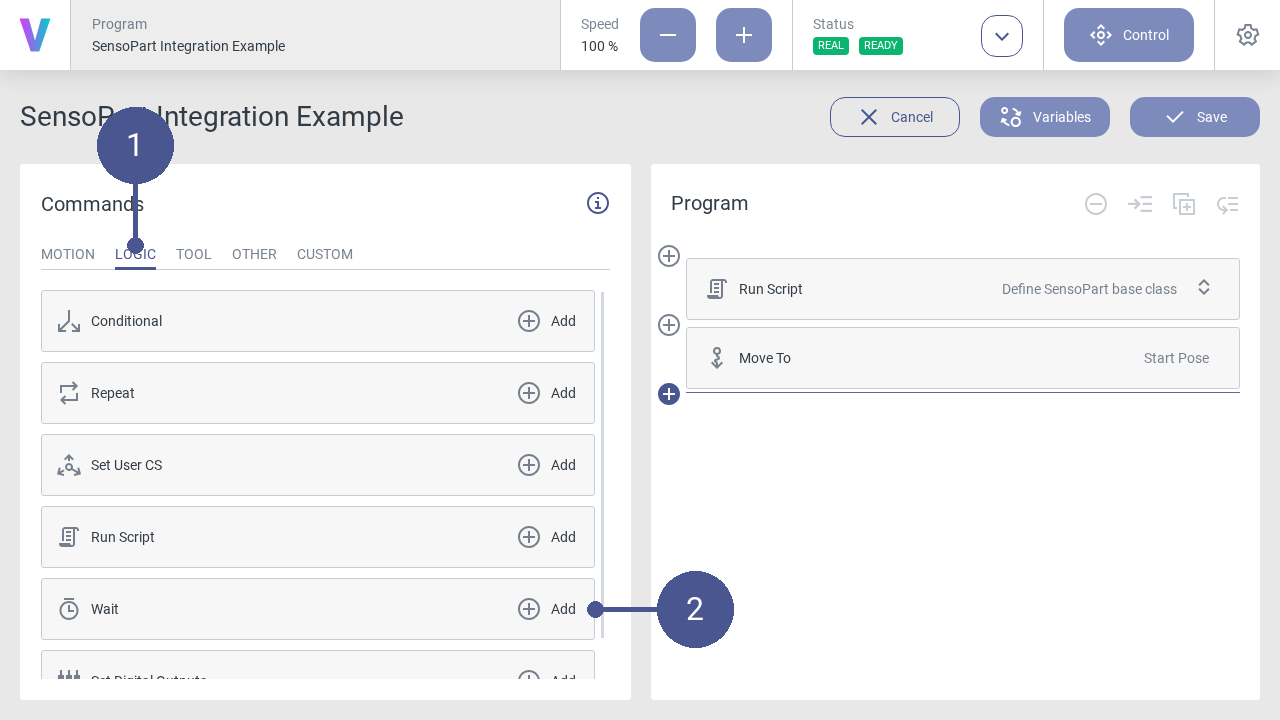
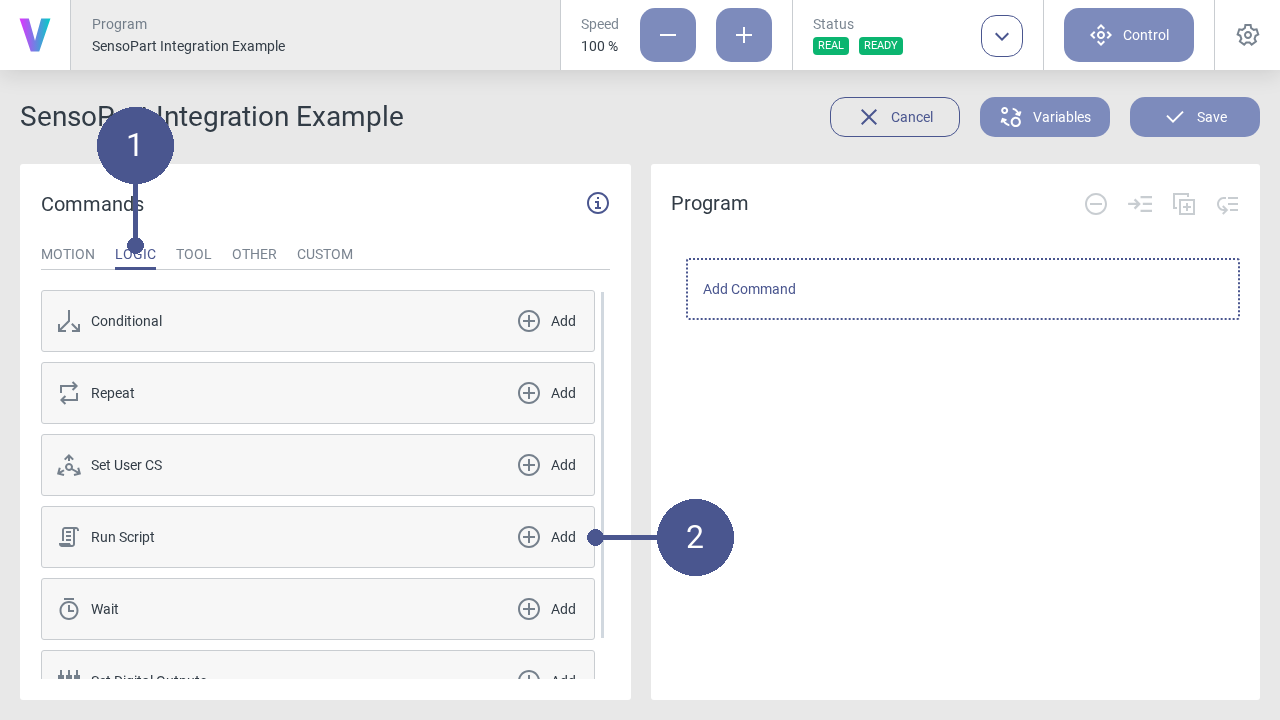
Navigate to the LOGIC tab (Fig. 60/➊) and select the Run Script command (Fig. 60/➋)
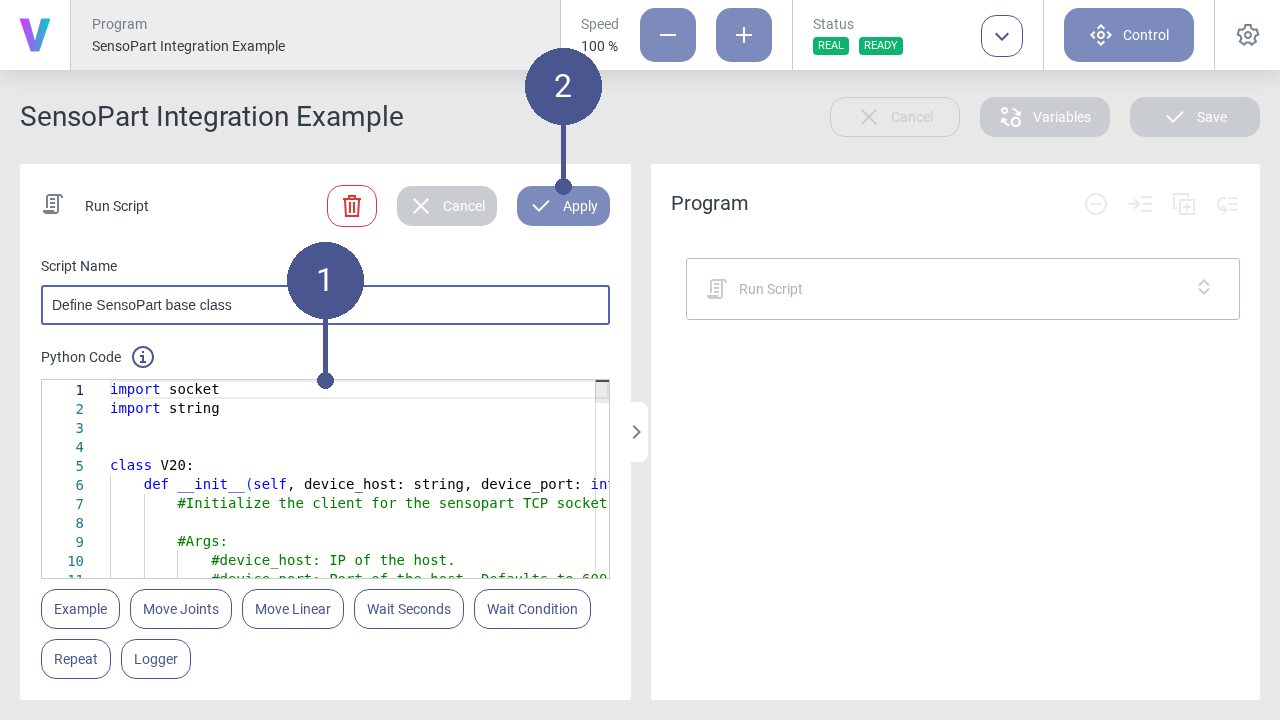
Copy and paste the content of the Python base class described in Tutorial: How to integrate a SensoPart camera with Python into the text field (Fig. 61/➊). Afterwards click on Apply (Fig. 61/➋)
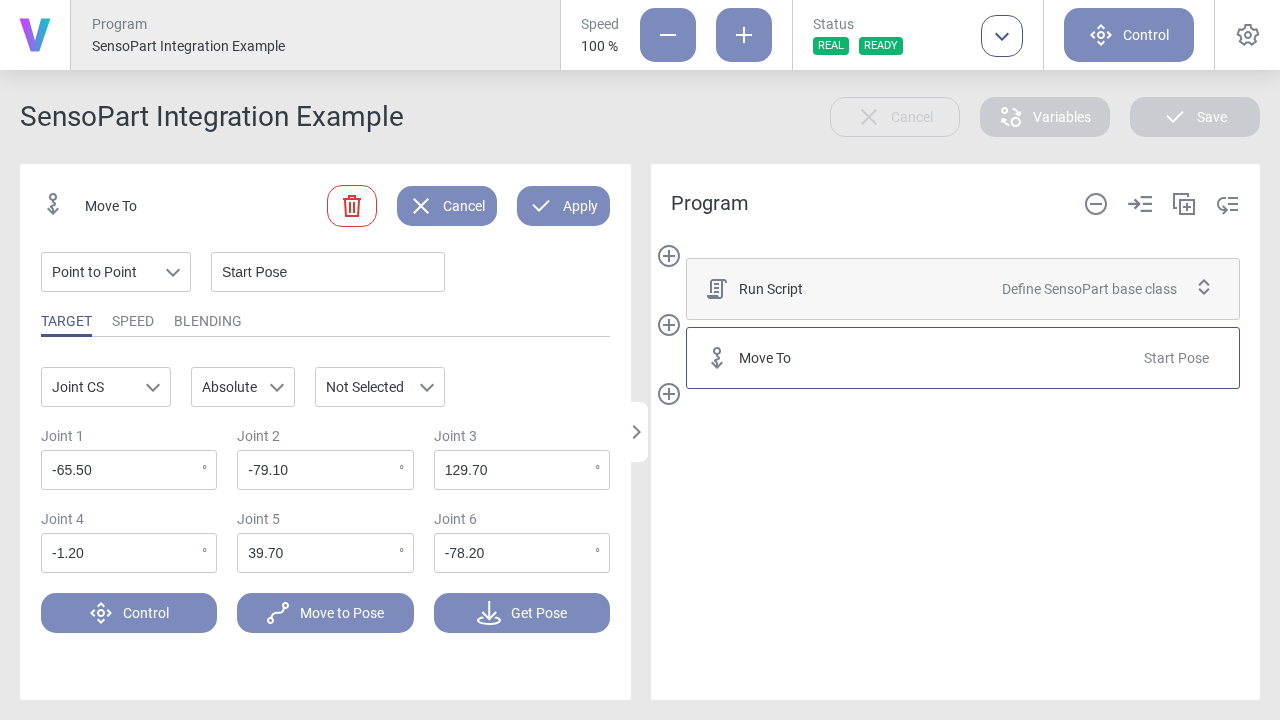
Next, add a Move To motion command to the starting pose of the program. The robot should be moved in such a way that the view of the camera is not obscured (Fig. 62).
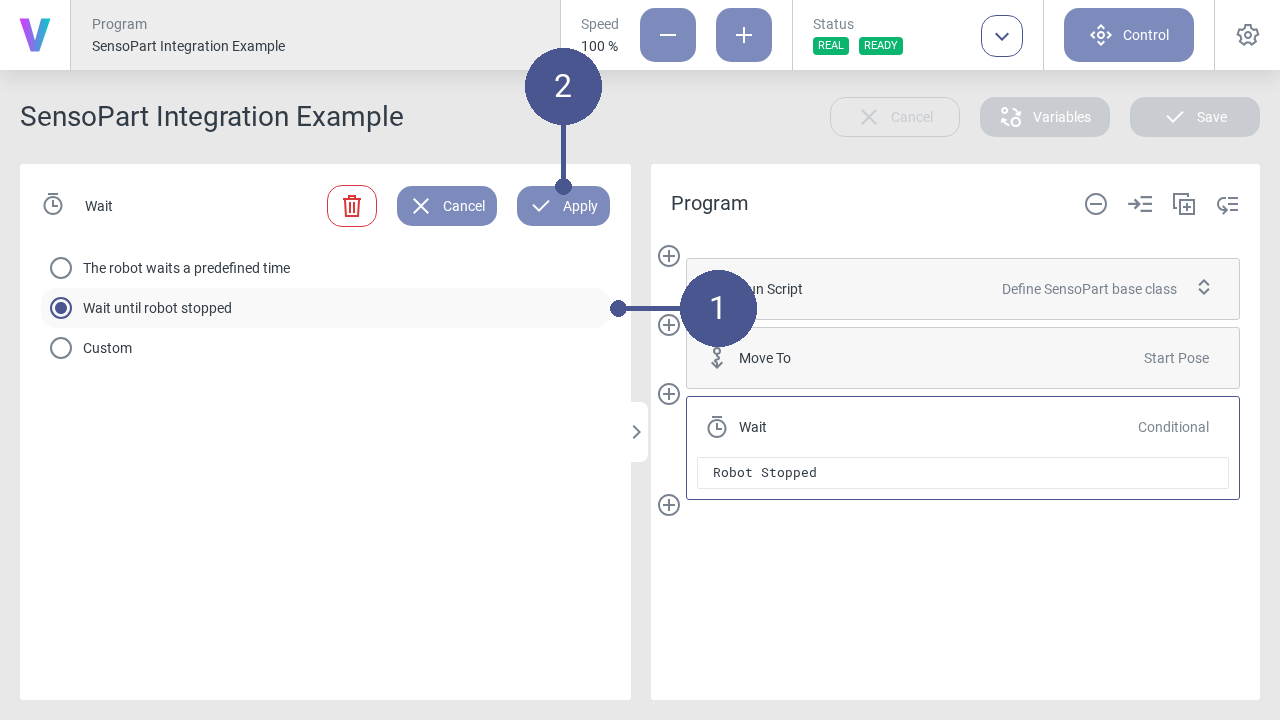
Before including another Python code block for detecting the object, add a Wait command, to wait for the robot to stop moving. Otherwise, the detection might trigger, although the starting pose was not reached yet.
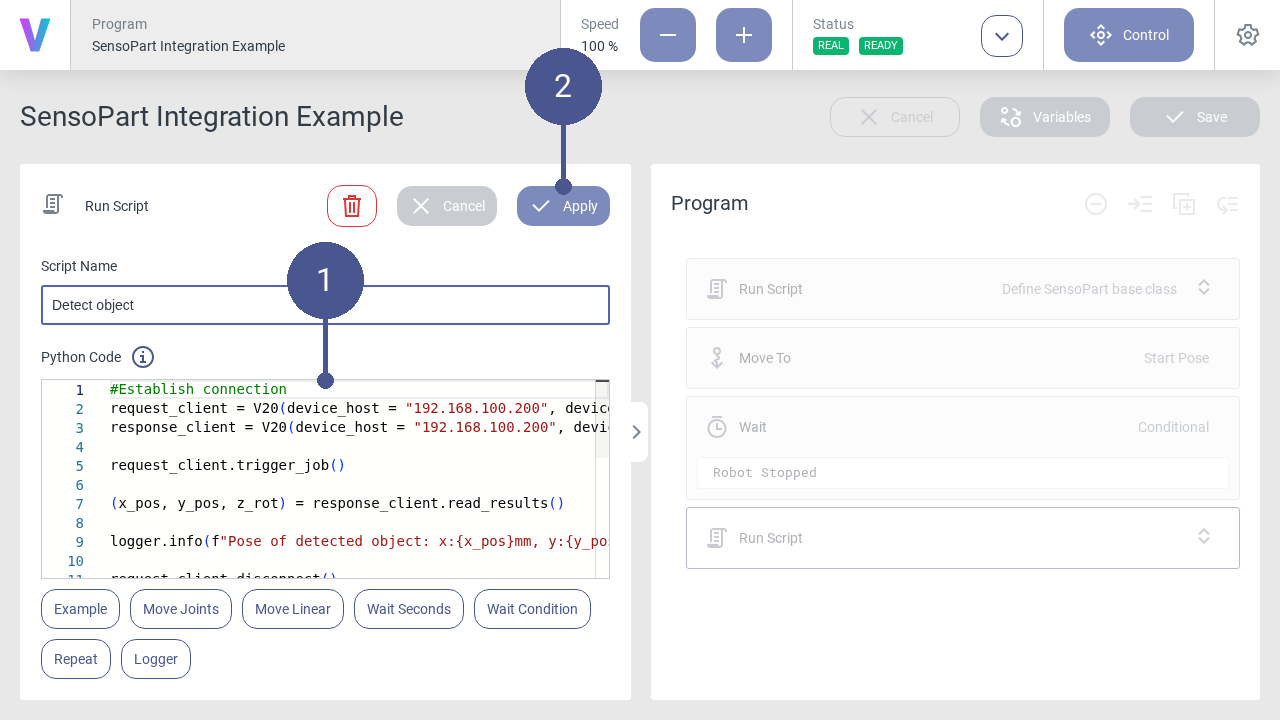
As in Fig. 60, add another Python code block in which the detection is triggered and the result is parsed (Fig. 65). The content (Fig. 65/➊) looks like the following:
 1    #Establish connection
 2    request_client = V20(device_host = "192.168.100.200", device_port = 2006)
 3    response_client = V20(device_host = "192.168.100.200", device_port = 2005)
 4
 5    request_client.trigger_job()
 6
 7    (x_pos, y_pos, z_rot) = response_client.read_results()
 8
 9    logger.info(f"Pose of detected object: x:{x_pos}mm, y:{y_pos}mm, z:{z_rot}°")
10
11    request_client.disconnect()
12    response_client.disconnect()
13
14    if x_pos == 0.0:
15        return
In this code block, two instances of the base class are initialized, one for the request channel and one for the response channel (Lines 2 & 3). Afterwards, the detection is triggered from the request client (Line 5) and the detection result is read out with the response client (Line 7). The connection to both clients is closed in Lines 11 & 12. In case that no object was detected, x_pos, y_pos, and z_rot will be all zero, terminating the program. This way, the robot does not try to move to the invalid pose (Line 14).
After the command is configured, click on Apply (Fig. 65/➋).
Add an additional Python code block that saves the detection result to USERCS1 (Fig. 66). The content (Fig. 66/➊) looks like the following:
1    import numpy as np
2
3    pose = robot_arm.Pose((x_pos/1000, y_pos/1000, 0, np.deg2rad(-180),0, np.deg2rad(z_rot)), enums.UserCS.ROBOTCS.value)
4    logger.info(f"Resulting Pose: {pose}")
5    self.robot.set_user_cs(pose, enums.UserCS.USERCS1.value)
6    time.sleep(0.1)
Note
The x-rotation of the USERCS1 is set to -180° (Line 3) because the tool coordinate system is flipped by 180° with respect to to the robot coordinate system.
The time.sleep(0.1) at the end (Line 6) ensures that the coordinate system is saved before it is used.
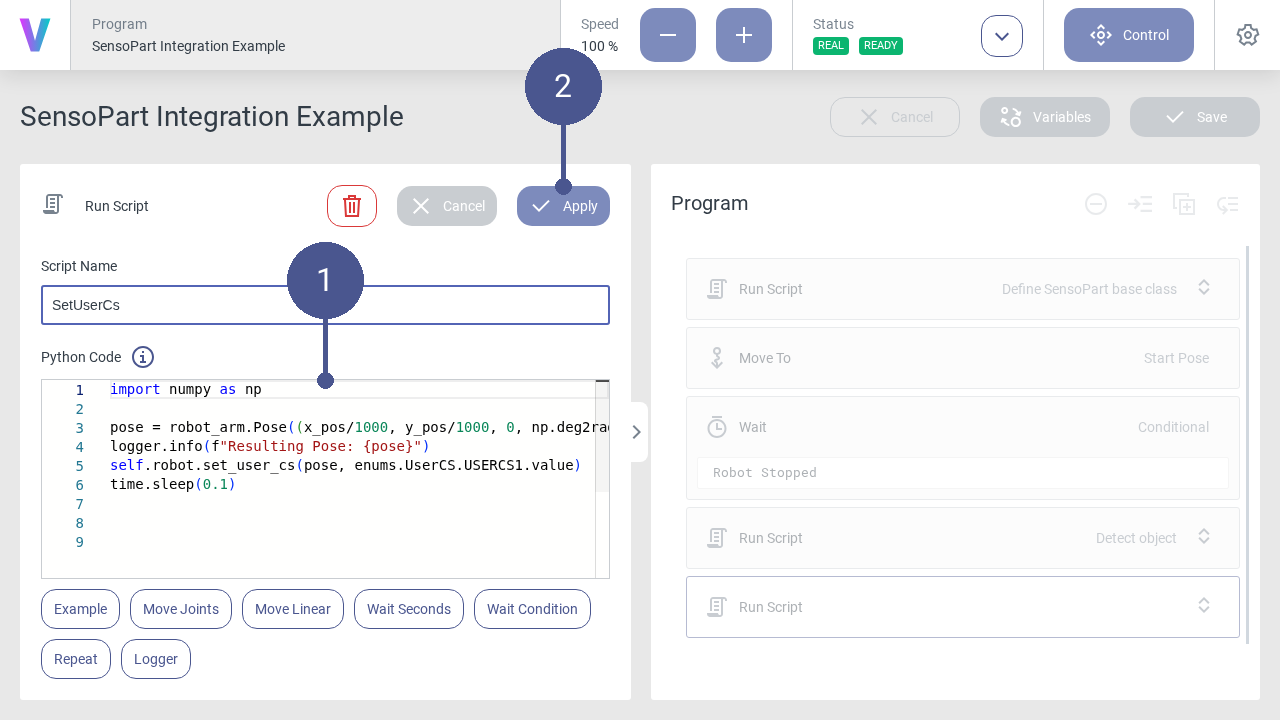
After the command is configured, click on Apply (Fig. 66/➋).
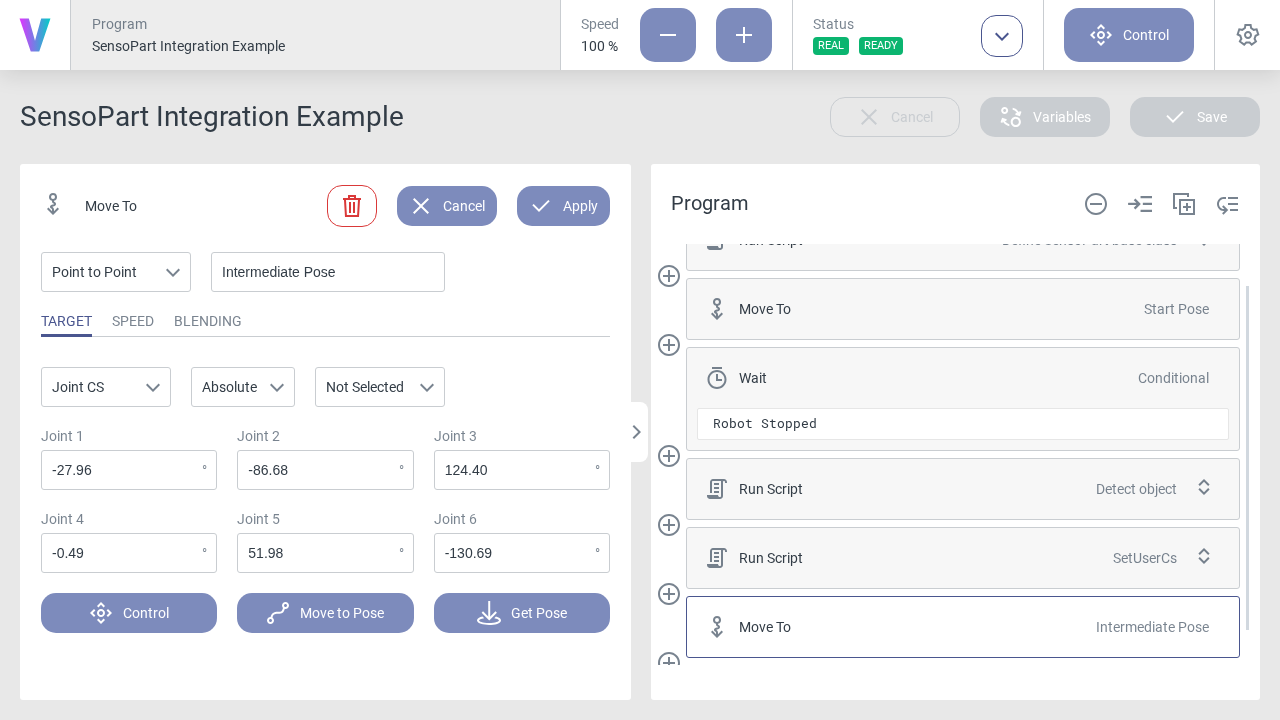
Depending on the workspace of the robot, it might be necessary to add some intermediate poses, so that the robot can move from the starting pose to the object pose without causing a collision with the environment. Add a Move To command containing the intermediate pose (Fig. 67).
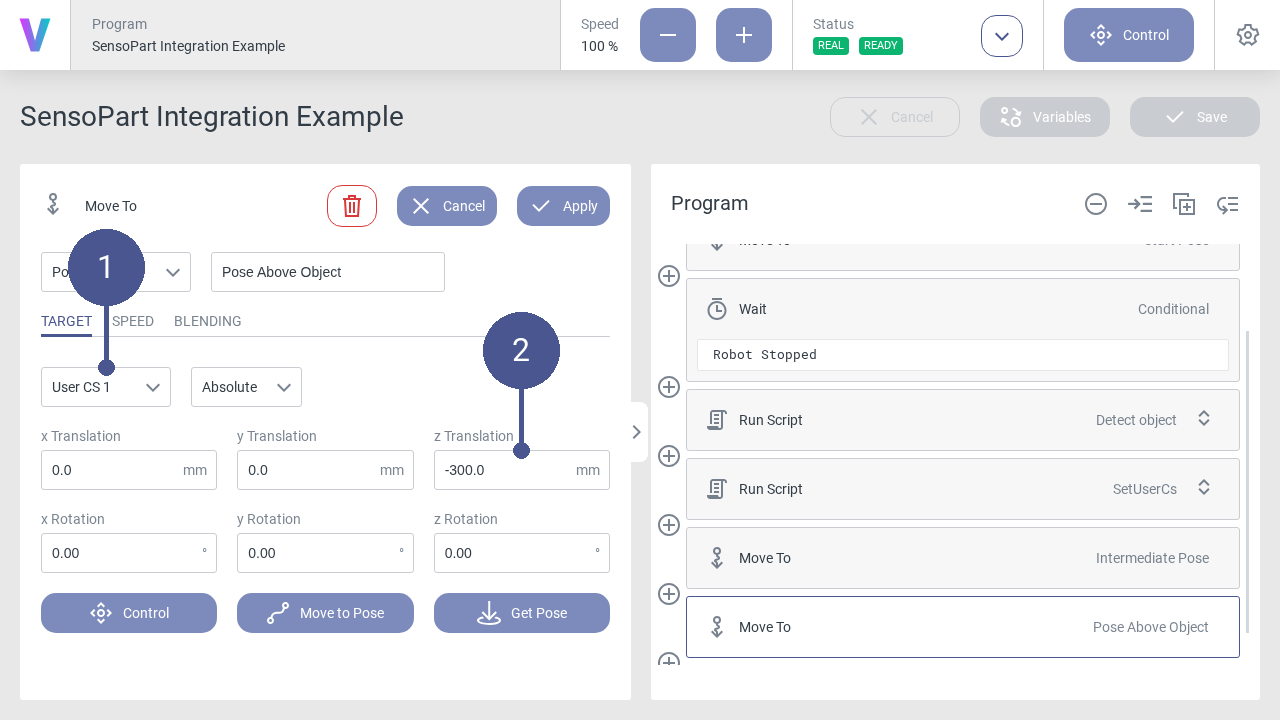
Now move to the detected object using the USERCS1 which was defined earlier. Add a Move To command and select the User CS 1 as the coordinate system (Fig. 68/➊). If you want to move to the center of the object (the detected coordinates represent the object’s center), keep the x Translation and y Translation values at 0.0. In this example, it is desired to move 300 mm above the object. Therefore, set the z Translation to -300 mm (Fig. 68/➋).
Note
Setting the z Translation to 0.0 could be used to grasp the object.
Note how negative values for the z Translation have to be used, due to the rotation of the USERCS1 by 180° around the x-axis.
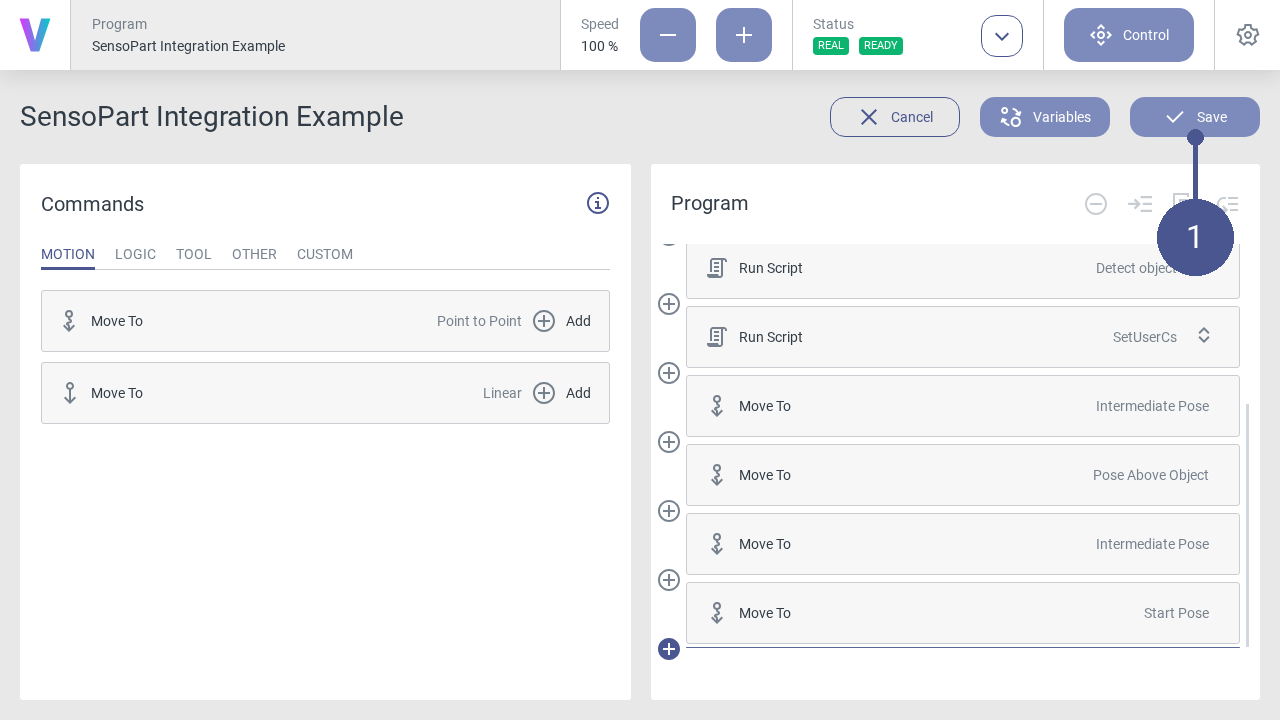
Finally, add two more Move To commands. One moving back to the intermediate position and one moving back to the starting position. The final program can now be saved (Fig. 69/➊).