
4. Use Cases
This chapter describes use cases that show how the voraus.core can be used to setup different automation solutions in conjunction with the voraus components. Through these use cases, you will gain a clear understanding of how the voraus software stack is utilized to address your needs and how easy it is to create solutions for all applications while also adjusting and optimizing your entire automation continuously during the whole operation lifetime.
4.1. Vision Based Pick and Place with a Conveyor Belt on KUKA
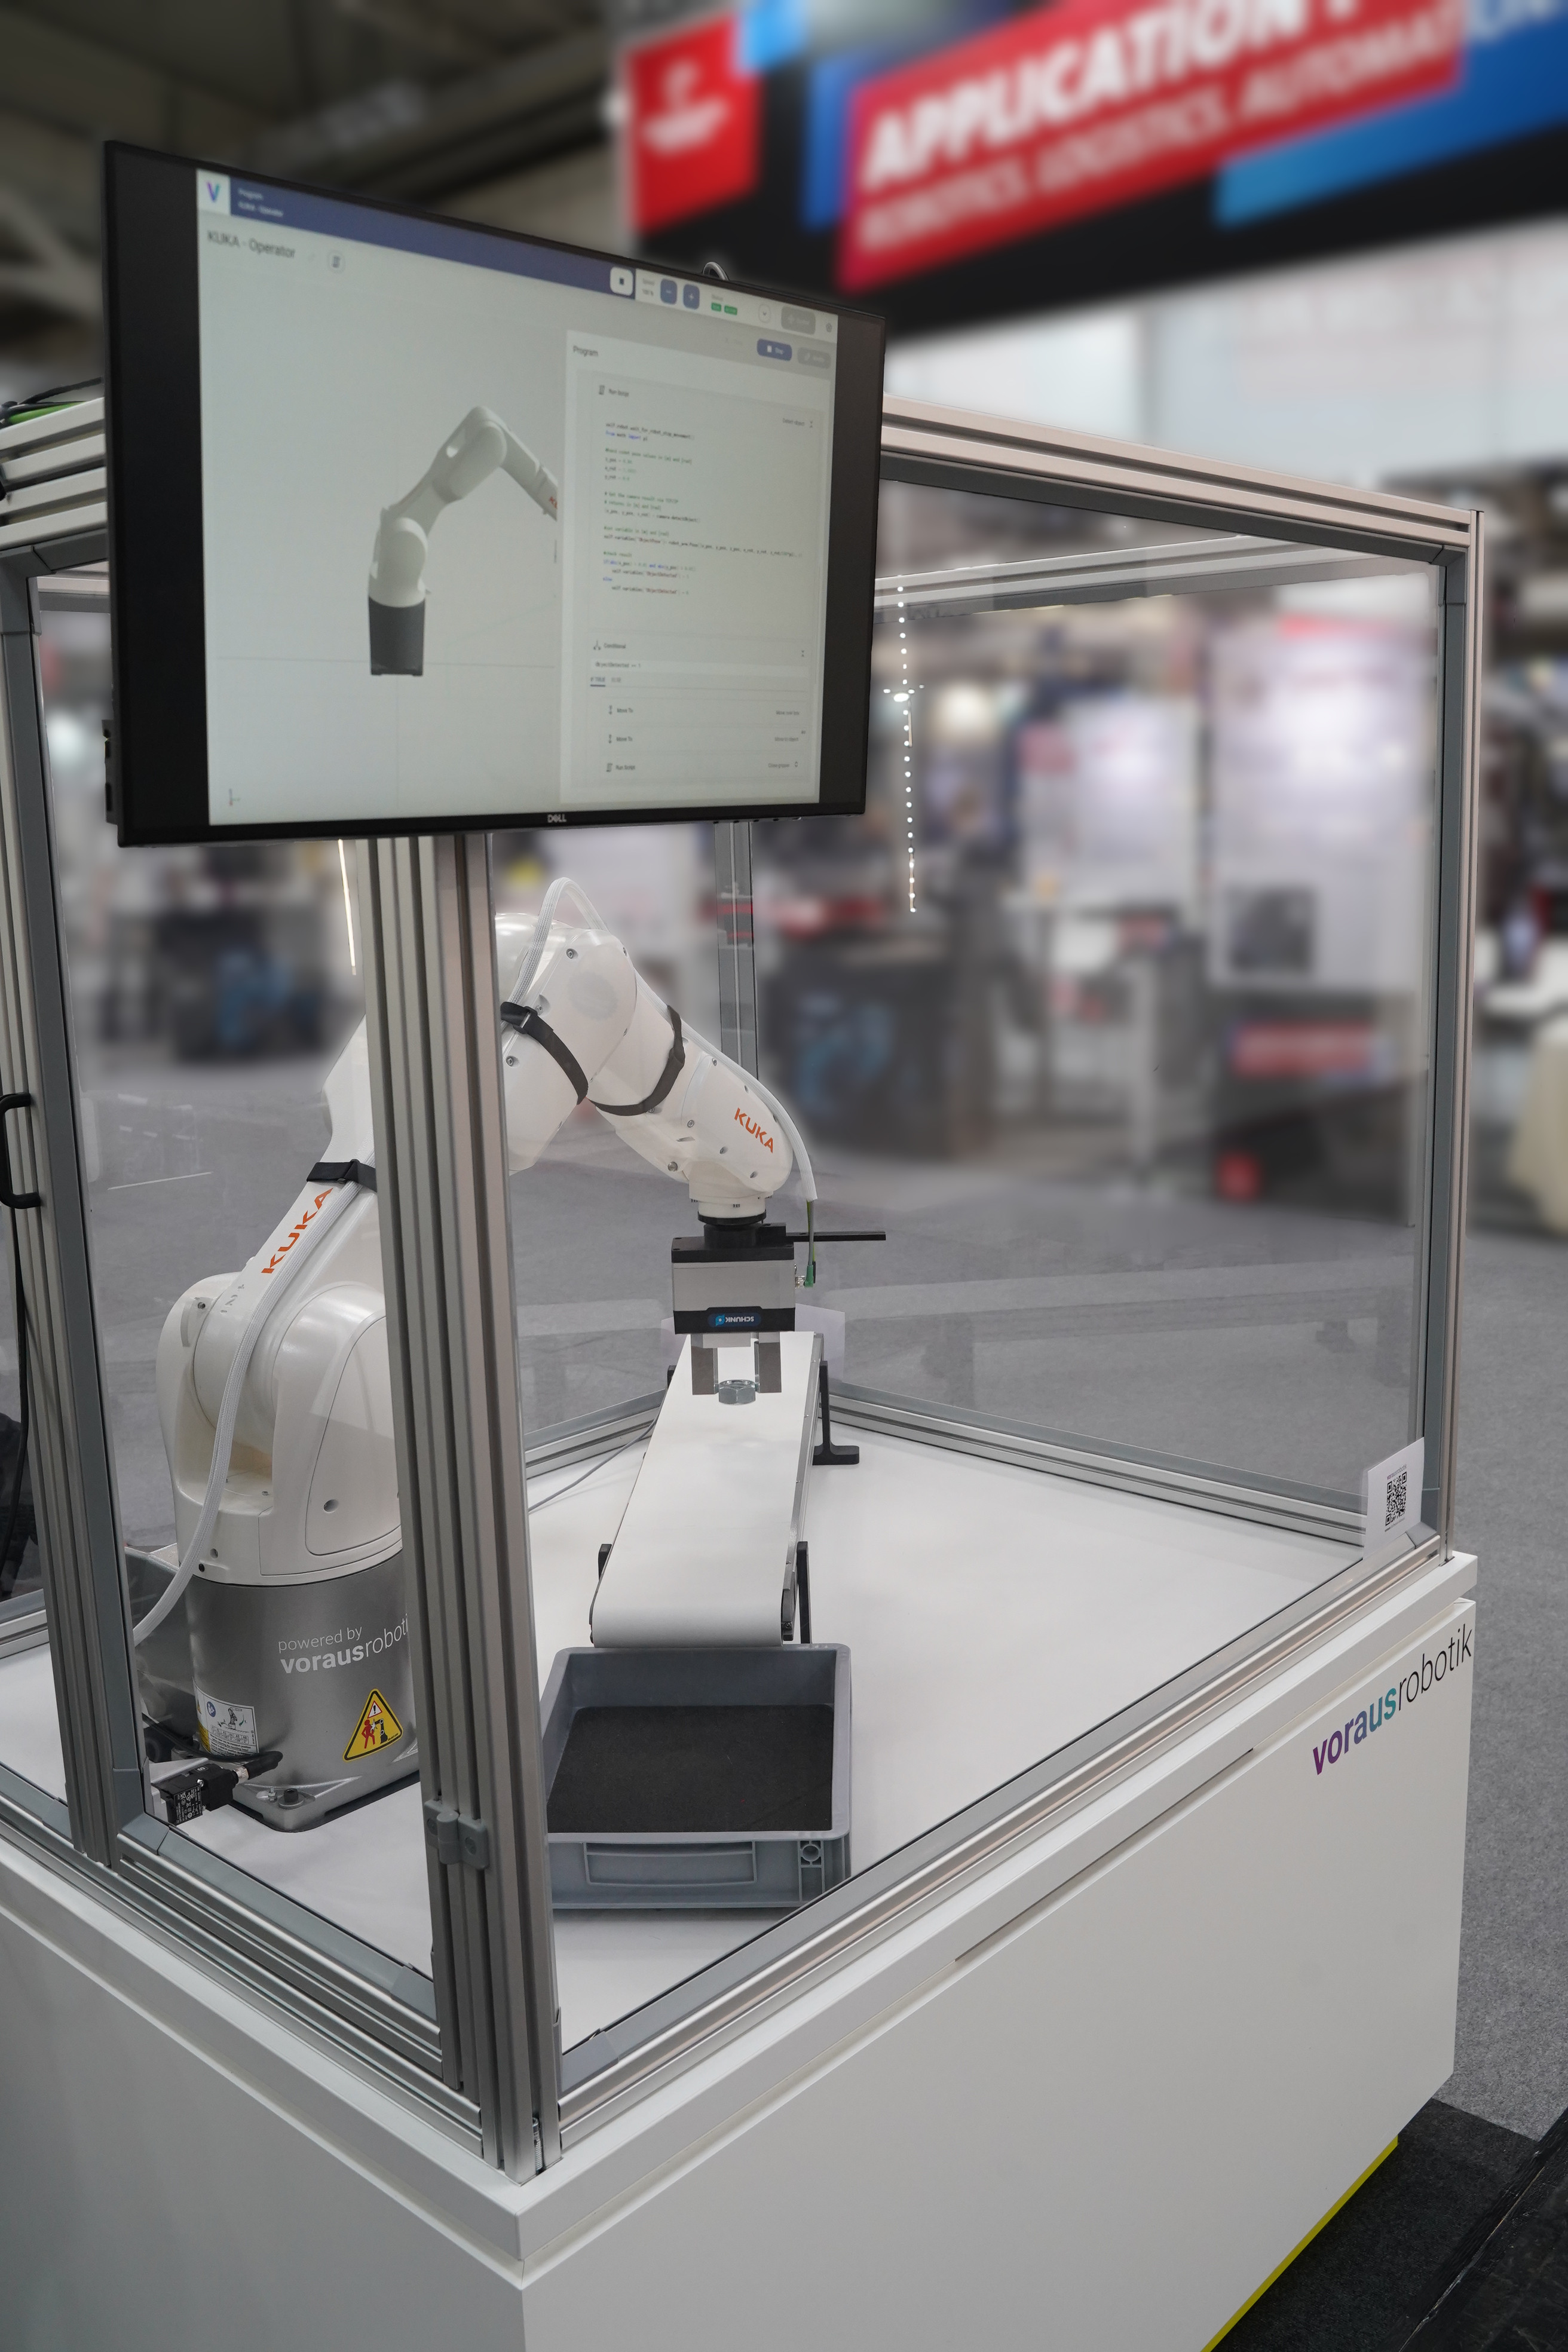
This tutorial will demonstrate how to create a vision based pick and place application with the voraus.operator like Fig. 70. The application uses a Sensopart V20-OB-A2-W12 camera for the vision based pose estimation that is mounted above the trace. A SCHUNK EGK 50 gripper and a Vetter conveyor belt FR-40-200-1000-10 controlled by a Beckhoff EL4004 4-channel analog output terminal are both connected via EtherCAT. The application is implemented on a KUKA robot.
4.1.1. Getting Started
Requirements
voraus products:
voraus.ipc (optional)
The voraus components and their purpose in this application is shown below:
        graph LR
    subgraph voraus.ipc
        direction TB
        ve["voraus EtherCAT"]
        subgraph vc["voraus.core //KUKA"]
            vo["voraus.operator"]
        end
    end

    subgraph EtherCAT Fieldbus
        direction LR
        ao["Analog Out"]
        ao --> gripper["Gripper"]
    end

    cam["Camera"]

    vc --:term:`TCP` trigger--> cam
    cam --position--> vc
    ve --process data--> ao
    vc --control--> kuka["KUKA Robot"]
    ao --voltage--> conv["Conveyor Belt"]
    User --program--> vo
Setup:
Prepare the camera following the Tutorial: How to integrate a SensoPart camera with the voraus.operator.
Connect the EtherCAT devices with the following topology:
voraus.ipc
├── Beckhoff EK1100 bus coupler
│   ├── Beckhoff EL1008 digital inputs (optional)
│   ├── Beckhoff EL2008 digital outputs (optional)
│   └── Beckhoff EL4004 analog outputs
└── SCHUNK EGK 50
Connect the PIN for the speed specification of the conveyor belt to analog output 1 of the EL4004 terminal.
Get the software package including the ESI file from the download section from the SCHUNK Product page. Extract and copy the ESI file to your TwinCAT installation path (default: “C:\TwinCAT\3.1\Config\Io\EtherCAT”).
4.1.2. Implementation Steps
Follow the steps from voraus EtherCAT: Digital IO Example to create an ENI File using TwinCAT and setup the voraus EtherCAT. During these steps autogenerated python code will be created from the device descriptions. For the used SCHUNK gripper the device description looks like shown in Fig. 71.
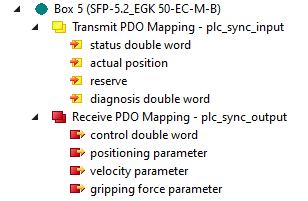
To increase the readability in the resulting code you can edit the naming. Thus, you can right-click on the Device Name or a process data obejct (PDO) name (Fig. 72/➊ + ➋) and then select “Rename” (Fig. 72/➌). To rename the PDO groups (Fig. 72/➍) you need to perform two consecutive single clicks.
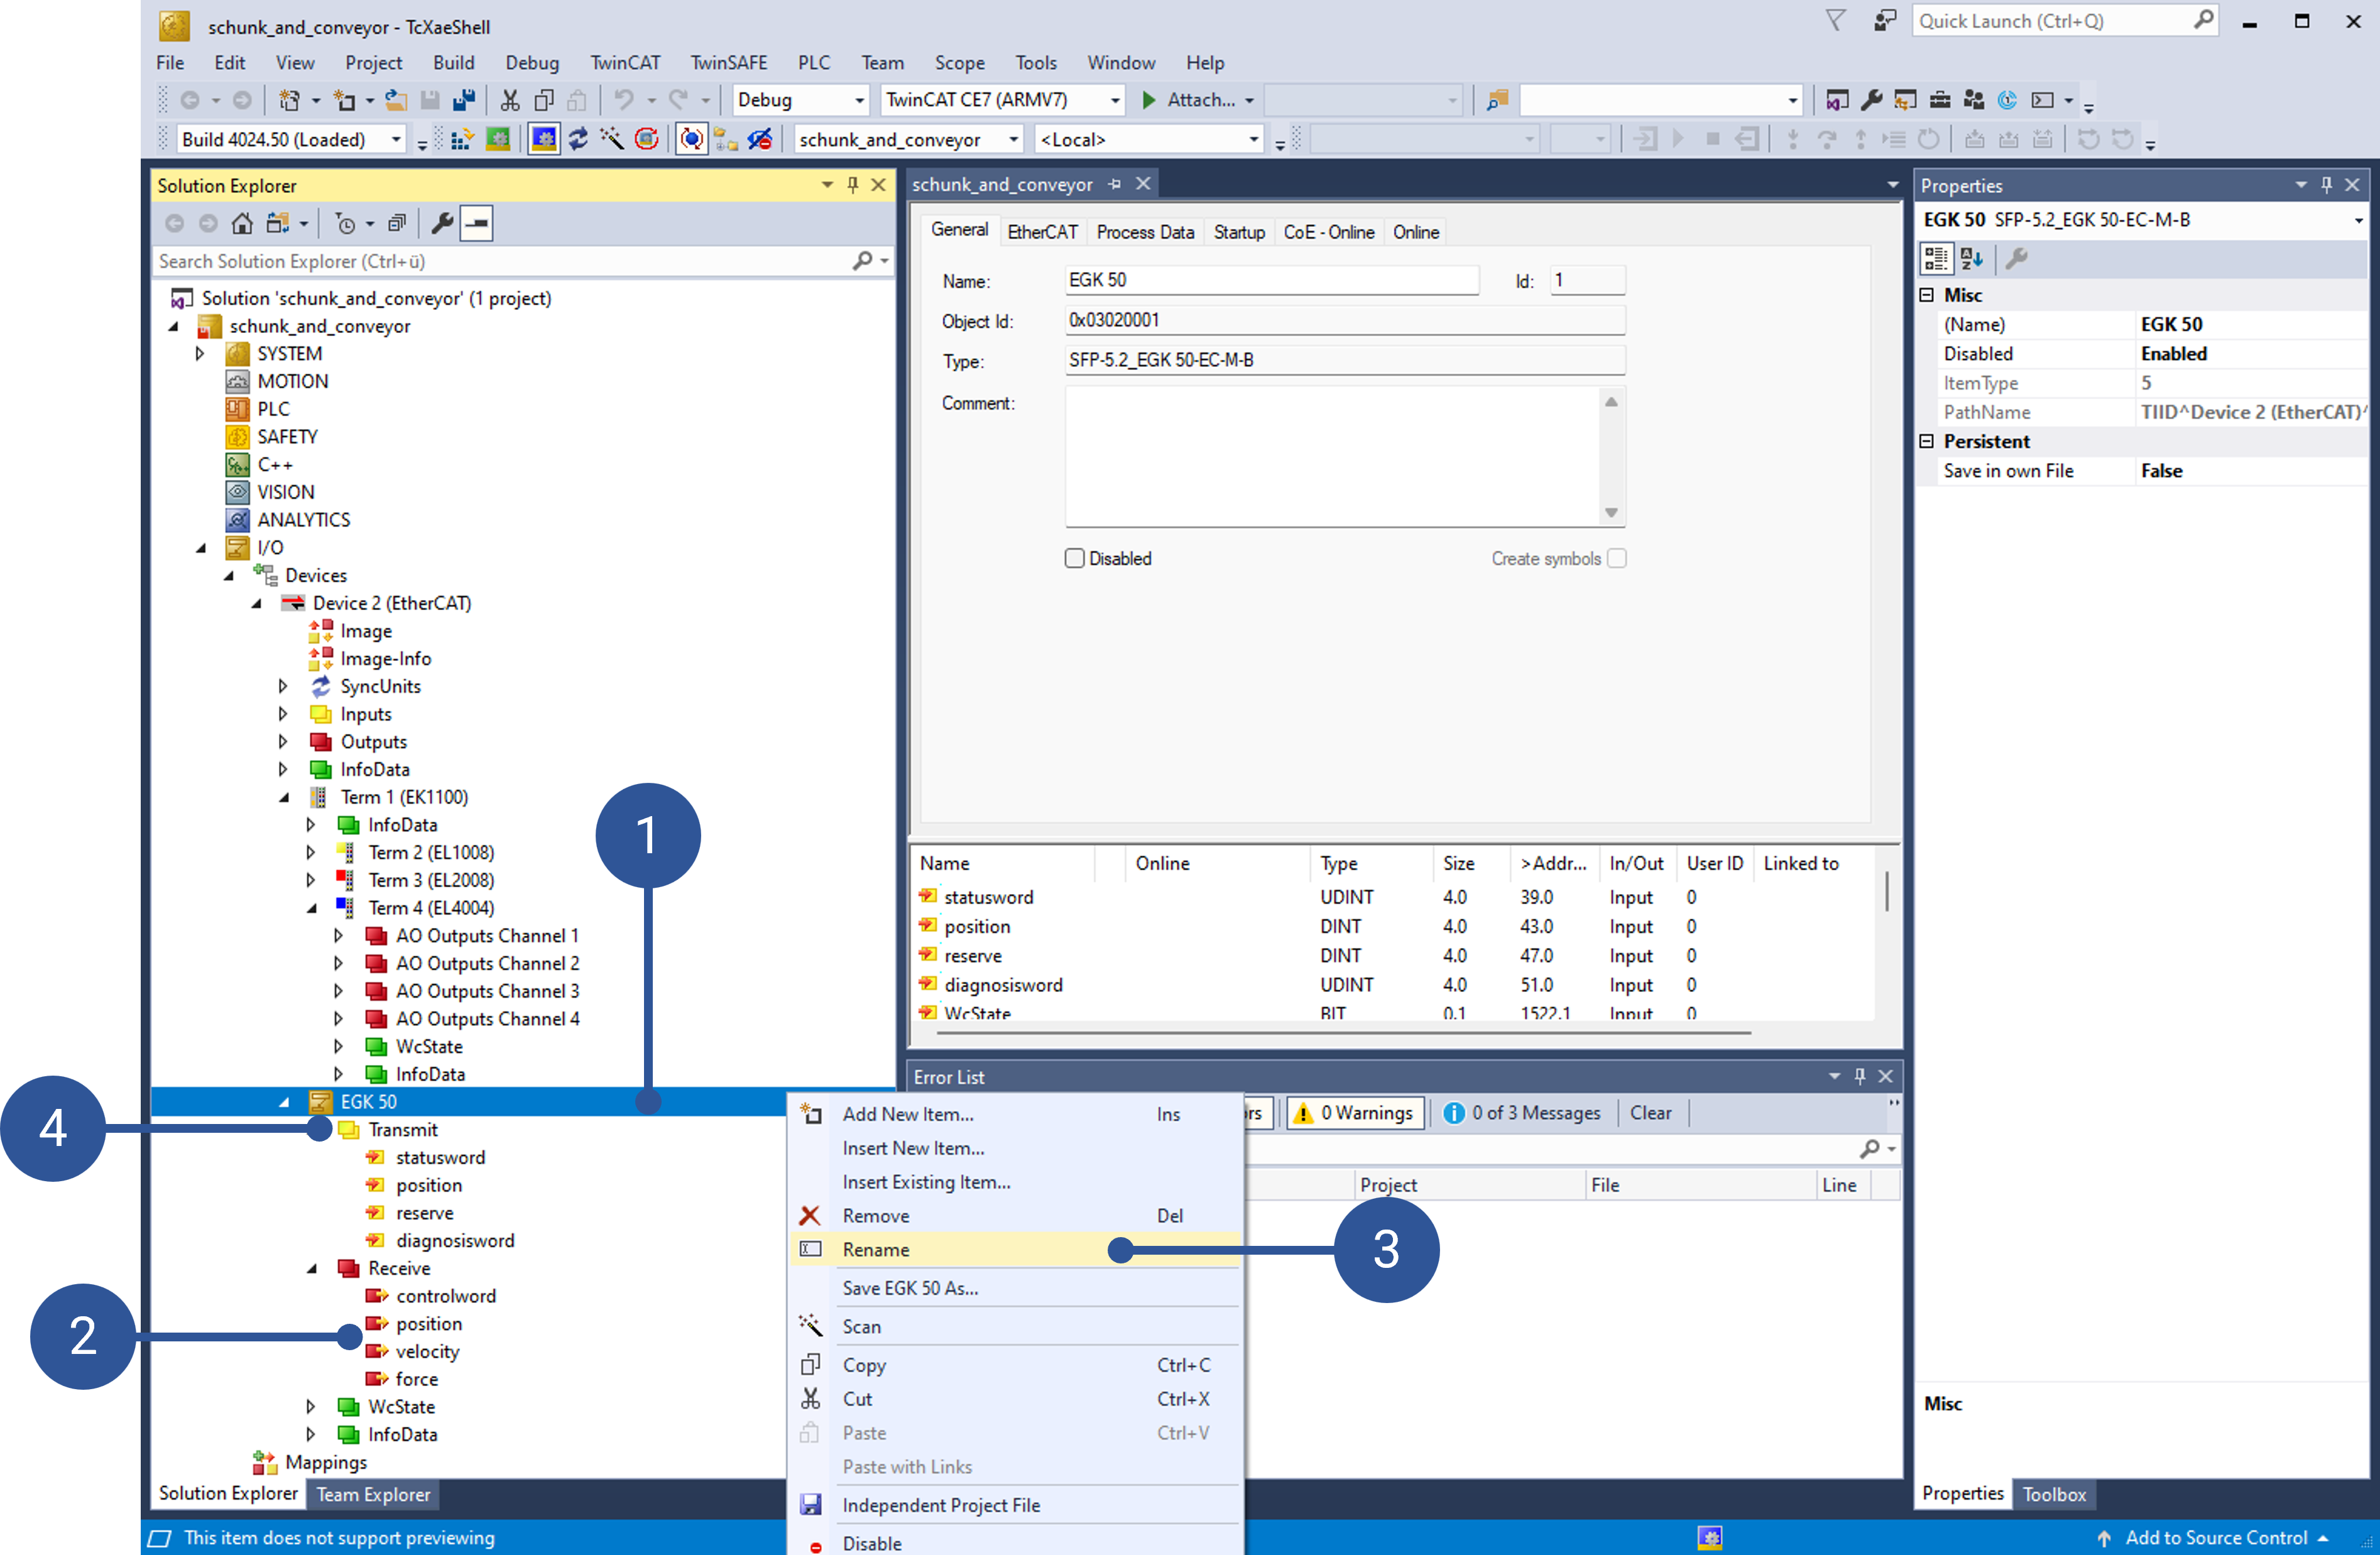
The resulting autogenerated code looks like this:
 1"""API for Schunk EGK 50 Gripper and Conveyor."""
 2
 3from voraus_ecat import EtherCAT, ProcessData, pdo
 4import time
 5from enum import IntEnum
 6
 7
 8class Inputs(ProcessData):
 9    """Defines process inputs."""
10
11    def __init__(self) -> None:
12        """Initializes process inputs."""
13        super().__init__()
14
15        self.egk_50_transmit_statusword = pdo.Unsigned32("1:EGK 50.Transmit.statusword")
16        self.egk_50_transmit_position = pdo.Integer32("1:EGK 50.Transmit.position")
17        self.egk_50_transmit_reserve = pdo.Integer32("1:EGK 50.Transmit.reserve")
18        self.egk_50_transmit_diagnosisword = pdo.Unsigned32("1:EGK 50.Transmit.diagnosisword")
19        self.term_2_el1008_channel_1_input = pdo.Bit1("1:Term 2 (EL1008).Channel 1.Input")
20        self.term_2_el1008_channel_2_input = pdo.Bit1("1:Term 2 (EL1008).Channel 2.Input")
21        self.term_2_el1008_channel_3_input = pdo.Bit1("1:Term 2 (EL1008).Channel 3.Input")
22        self.term_2_el1008_channel_4_input = pdo.Bit1("1:Term 2 (EL1008).Channel 4.Input")
23        self.term_2_el1008_channel_5_input = pdo.Bit1("1:Term 2 (EL1008).Channel 5.Input")
24        self.term_2_el1008_channel_6_input = pdo.Bit1("1:Term 2 (EL1008).Channel 6.Input")
25        self.term_2_el1008_channel_7_input = pdo.Bit1("1:Term 2 (EL1008).Channel 7.Input")
26        self.term_2_el1008_channel_8_input = pdo.Bit1("1:Term 2 (EL1008).Channel 8.Input")
27
28
29class Outputs(ProcessData):
30    """Defines process outputs."""
31
32    def __init__(self) -> None:
33        """Initializes process outputs."""
34        super().__init__()
35
36        self.egk_50_receive_controlword = pdo.Unsigned32("1:EGK 50.Receive.controlword")
37        self.egk_50_receive_position = pdo.Integer32("1:EGK 50.Receive.position")
38        self.egk_50_receive_velocity = pdo.Integer32("1:EGK 50.Receive.velocity")
39        self.egk_50_receive_force = pdo.Integer32("1:EGK 50.Receive.force")
40        self.term_4_el4004_ao_outputs_channel_1_analog_output = pdo.Integer16("1:Term 4 (EL4004).AO Outputs Channel 1.Analog output")
41        self.term_4_el4004_ao_outputs_channel_2_analog_output = pdo.Integer16("1:Term 4 (EL4004).AO Outputs Channel 2.Analog output")
42        self.term_4_el4004_ao_outputs_channel_3_analog_output = pdo.Integer16("1:Term 4 (EL4004).AO Outputs Channel 3.Analog output")
43        self.term_4_el4004_ao_outputs_channel_4_analog_output = pdo.Integer16("1:Term 4 (EL4004).AO Outputs Channel 4.Analog output")
44        self.term_3_el2008_channel_1_output = pdo.Bit1("1:Term 3 (EL2008).Channel 1.Output")
45        self.term_3_el2008_channel_2_output = pdo.Bit1("1:Term 3 (EL2008).Channel 2.Output")
46        self.term_3_el2008_channel_3_output = pdo.Bit1("1:Term 3 (EL2008).Channel 3.Output")
47        self.term_3_el2008_channel_4_output = pdo.Bit1("1:Term 3 (EL2008).Channel 4.Output")
48        self.term_3_el2008_channel_5_output = pdo.Bit1("1:Term 3 (EL2008).Channel 5.Output")
49        self.term_3_el2008_channel_6_output = pdo.Bit1("1:Term 3 (EL2008).Channel 6.Output")
50        self.term_3_el2008_channel_7_output = pdo.Bit1("1:Term 3 (EL2008).Channel 7.Output")
51        self.term_3_el2008_channel_8_output = pdo.Bit1("1:Term 3 (EL2008).Channel 8.Output")
The Inputs and Outputs of the SCHUNK gripper are accessible with the variables in Lines 15 to 18 & 36 to 39, respectively. The variable to control the conveyor is the one in Line 40. Add this code to the voraus.operator program from Sensopart with Operator: Implementation Steps as a Run Script command. This enables other commands to use the voraus EtherCAT within the program.
Add another Run Script command for the Conveyor class, which sets the analog output to control the conveyor’s speed (Line 8):
 1from enum import IntEnum
 2
 3class Conveyor:
 4    def __init__(self, ethercat: EtherCAT):
 5        self.ethercat = ethercat
 6
 7    def set_voltage(self, voltage: float) -> None:
 8        self.ethercat.outputs.term_4_el4004_ao_outputs_channel_1_analog_output.set(round((voltage/10)*32767))
 9        ethercat.write_pdos()
10
11    def stop(self) -> None:
12        self.set_voltage(0.7)
13
14    def default_velocity(self) -> None:
15        self.set_voltage(0.0)
16
17    def set_velocity(self, velocity):
18        if velocity <= 0:
19            self.stop()
20        else:
21            voltage = min((velocity * 9) + 1, 10.0)
22            self.set_voltage(voltage)
For the SCHUNK gripper add a further Run Script command:
  1import time
  2from enum import IntEnum
  3
  4
  5class EGK50:
  6    MIN_TORQUE = 50  # value in %
  7    MAX_TORQUE = 100
  8    MIN_VELOCITY = 6250
  9    MAX_VELOCITY = 130000
 10
 11    class ControlWord(IntEnum):
 12        FAST_STOP = 0
 13        STOP = 1
 14        ACKNOWLEDGE = 2
 15        RELEASE_FOR_MANUAL_MOVEMENT = 5
 16        GRIP_DIRECTION = 7
 17        RELEASE_WORKPIECE = 11
 18        GRIP_WORKPIECE = 12
 19        MOVE_TO_ABSOLUTE_POSITION = 13
 20        MOVE_TO_RELATIVE_POSITION = 14
 21        ACTIVATE_GPE = 31
 22
 23    class StatusWord(IntEnum):
 24        READY_FOR_OPERATION = 0
 25        READY_FOR_SHUTDOWN = 2
 26        COMMAND_SUCCESS = 4
 27        COMMAND_RECEIVE_TOGGLE = 5
 28        WARNING = 6
 29        ERROR = 7
 30        RELEASE_FOR_MANUAL_MOVEMENT = 8
 31        SOFTWARE_LIMIT_REACHED = 9
 32        NO_WORKPIECE = 11
 33        WORKPIECE_GRIPPED = 12
 34        POSITION_REACHED = 13
 35        WORKPIECE_LOST = 16
 36        WRONG_WORKPIECE = 17
 37        GPE = 31
 38
 39    def __init__(self, ethercat: EtherCAT):
 40        self.ethercat = ethercat
 41
 42        # outupts
 43        self.control_word = 0
 44        self.target_position = 0
 45        self.velocity = 0
 46        self.torque = 0
 47
 48        # inputs
 49        self.status_word = 0
 50        self.current_position = 0
 51
 52        self._update()
 53        self.control_word = 1 << EGK50.ControlWord.FAST_STOP  # fast stop is 0 active --> set to high
 54        self.velocity = MIN_VELOCITY
 55        self.torque = MIN_TORQUE
 56        self._update()
 57        self._ack_error()
 58
 59    def move_to_absolute_position(self, position: int, velocity: int = MAX_VELOCITY) -> None:
 60        """Move the motor to a specified position with a given velocity.
 61
 62        Parameters:
 63            position (int): Target position in µm.
 64            velocity (int): Movement speed in µm/s (default is MAX_VELOCITY).
 65
 66        Raises:
 67            ValueError: If velocity is outside the range [MIN_VELOCITY, MAX_VELOCITY].
 68            RuntimeError: If a warning or error occurs during the movement.
 69        """
 70        self.target_position = position
 71        if velocity < self.MIN_VELOCITY:
 72            raise ValueError(f"Velocity must be at least {self.MIN_VELOCITY} µm/s")
 73        if velocity > self.MAX_VELOCITY:
 74            raise ValueError(f"Velocity mustn't be larger than {self.MAX_VELOCITY} µm/s")
 75        self.velocity = velocity
 76        self.torque = 0
 77        self._update()
 78        self.control_word |= 1 << EGK50.ControlWord.MOVE_TO_ABSOLUTE_POSITION
 79        self._update()
 80        try:
 81            while True:
 82                self._update()
 83                if self.test_statusword_bit(EGK50.StatusWord.COMMAND_SUCCESS):  # done
 84                    self._update()
 85                    return
 86                if self.warning_or_error_present():
 87                    raise RuntimeError("Failed to move to absolute position!")
 88        finally:
 89            self.control_word &= ~(1 << EGK50.ControlWord.MOVE_TO_ABSOLUTE_POSITION)
 90            self._update()
 91
 92    def _ack_error(self) -> None:
 93        self.control_word |= 1 << EGK50.ControlWord.ACKNOWLEDGE
 94        self._update()
 95        self.control_word &= ~(1 << EGK50.ControlWord.ACKNOWLEDGE)
 96        self._update()
 97
 98    def warning_or_error_present(self) -> bool:
 99        """Check if there is a warning or error present.
100
101        Returns:
102            True if a warning or error is present, False otherwise.
103        """
104        return self.test_statusword_bit(EGK50.StatusWord.WARNING) or self.test_statusword_bit(EGK50.StatusWord.ERROR)
105
106    def test_statusword_bit(self, bit: StatusWord) -> bool:
107        """Test if a specific bit is set in the status word.
108
109        Parameters:
110            bit: The bit to test in the status word.
111
112        Returns:
113            True if the specified bit is set, False otherwise.
114        """
115        return self.status_word & (1 << bit) > 0
116
117    def grip_object(self, torque: int = MIN_TORQUE) -> bool:
118        """Grip an object with the specified torque.
119
120        Args:
121            torque (int): The torque value (in percentage) to apply. Default is 50.
122
123        Returns:
124            success: Whether an object was grabbed or not
125        """
126        if torque < self.MIN_TORQUE:
127            raise ValueError("Torque must be at least 50%!")
128        if torque > self.MAX_TORQUE:
129            raise ValueError("Torque can not be larger than 100%!")
130        self.velocity = 0
131        self.torque = torque
132        self._update()
133        self.control_word |= 1 << EGK50.ControlWord.GRIP_WORKPIECE
134        self._update()
135        success = False
136        try:
137            while True:
138                self._update()
139                if self.test_statusword_bit(EGK50.StatusWord.COMMAND_SUCCESS):  # done
140                    self._update()
141                    success = True
142                    break
143                if self.test_statusword_bit(EGK50.StatusWord.NO_WORKPIECE):
144                    success = False
145                    break
146                if self.warning_or_error_present():
147                    success = False
148                    break
149        finally:
150            self.control_word &= ~(1 << EGK50.ControlWord.GRIP_WORKPIECE)
151            self._update()
152        return success
153
154    def _update(self) -> None:
155        self.ethercat.outputs.egk_50_receive_controlword.set(self.control_word)
156        self.ethercat.outputs.egk_50_receive_position.set(self.target_position)
157        self.ethercat.outputs.egk_50_receive_velocity.set(self.velocity)
158        self.ethercat.outputs.egk_50_receive_force.set(self.torque)
159        self.ethercat.write_pdos()
160        time.sleep(0.1)
161        self.ethercat.read_pdos()
162
163        self.control_word = self.ethercat.outputs.egk_50_receive_controlword.get()
164        self.target_position = self.ethercat.outputs.egk_50_receive_position.get()
165        self.velocity = self.ethercat.outputs.egk_50_receive_velocity.get()
166        self.torque = self.ethercat.outputs.egk_50_receive_force.get()
167
168        self.status_word = self.ethercat.inputs.egk_50_transmit_statusword.get()
169        self.current_position = self.ethercat.inputs.egk_50_transmit_position.get()
The controlword GRIP_WORKPIECE (Line 112) used in the method grip_object() (Line 95) is meant to
close the gripper force-based, therefore, it can deal with objects of different sizes. However, the gripper is pretty
slow in this mode. That is why opening the gripper with the faster mode MOVE_TO_ABSOLUTE_POSITION (Line 68) in
method move_to_absolute_position() (Line 59) is more convenient.
Next you can create an EtherCAT Client instance (Line 1). With an established connection to the voraus EtherCAT (Line 2) you can set the master into operational state (Line 3) to cyclically update the process data. Finally you can create instances of the conveyor and the gripper class (Line 4 & 5):
1ethercat = EtherCAT(inputs=Inputs(), outputs=Outputs())
2with ethercat.connection(ETHERCAT_MASTER_OPCUA_URL):
3    ethercat.set_op_state()
4    conveyor = Conveyor(ethercat)
5    gripper = EGK50(ethercat)
Now you can add the new gripper and conveyor commands to the appropriate positions in the voraus.operator program from Sensopart with Operator: Implementation Steps. After reaching the tool position from the camera you can grip the object with:
1self.robot.wait_for_robot_stop_movement()
2
3with ethercat.connection(ETHERCAT_MASTER_OPCUA_URL):
4    gripper.grip_object()
Then you can drive to a position right over the conveyor and release the object with the following code:
1self.robot.wait_for_robot_stop_movement()
2
3with ethercat.connection(ETHERCAT_MASTER_OPCUA_URL):
4    gripper.move_to_absolute_position(60000)
and finally, start the conveyor to move the object back to the start position with:
1self.robot.wait_for_robot_stop_movement()
2
3with ethercat.connection(ETHERCAT_MASTER_OPCUA_URL):
4    conv.set_velocity(1.0)
while the robot can move back to its starting position, too. To stop the conveyor add:
1self.robot.wait_for_robot_stop_movement()
2
3with ethercat.connection(ETHERCAT_MASTER_OPCUA_URL):
4    conv.stop()
4.2. Deployment Example
This tutorial aims to explore the various ways to personalize the voraus software stack. It provides an overview of the services available, how they can be configured, and how users can customize their setup to meet specific requirements. In this example a development container is used, for further information please refer to the documentation about how to use VS Code and Docker in the voraus.pioneer Examples documentation.
4.2.1. voraus Services
The Compose file declares different services. Each service is explained in the following sections. Information on ports and environment variables is provided.
voraus.core
The voraus.core is the Docker image that includes most of the services required to build a modern automation stack. Through its open API (OPC UA and Python) it ensures flexible integration of devices and functionality from the driver level to the top interface level. The latter allows the voraus.core to be connected to higher-level platforms such as graphical user interfaces like the voraus.operator, ERP, or cloud services. The voraus.core service depends on CodeMeter, this service is explained later in this Chapter, see CodeMeter.
Environment variables
Variable |
Purpose |
Possible Value / Example |
|---|---|---|
CODEMETER__HOST |
Host name of the CodeMeter container for the license allocations. |
codemeter |
VORAUS__robot__robotType |
Configuration of used robot type. |
See table below or Requirements |
VORAUS__robot__isVirtual |
Changes the robot virtual mode in the system configuration. |
{True, False} |
VORAUS__components__{component-key}__enabled |
Enables/Disables a component |
{True, False} |
VORAUS__components__{component-key}__bindIp |
Modifies the bind IP of a component. It must be 0.0.0.0 in the Docker context. |
0.0.0.0, 127.0.0.1,… |
VORAUS__components__{component-key}__host |
Can be used to specify the host in the connection URI to this component. |
|
VORAUS__components__{component-key}__bindPort |
Modifies the bind port of a component. |
40401, 5000, … |
VORAUS__components__{component-key}__bindProtocol |
Modifies the bind protocol of a component. |
{opc.tcp, http, https} |
The following table lists all available robot types that can be configured in the Docker Compose File via the VORAUS__robot__robotType variable.
voraus.core Ports
Ports refer to the Docker container; port mapping can be carried out in the compose file. In the exemplary voraus Docker Compose files the voraus.operator is accessible via port 8080.
Component |
Component Key |
Docker Container Port |
|---|---|---|
voraus System Control |
voraus-system-control-py |
48400 |
voraus Robot Control |
voraus-robot-control |
48401 |
voraus Userapp / voraus Robot |
48403 |
|
voraus Error Handler |
voraus-error-handler |
48404 |
voraus.operator |
voraus-hmi |
80 |
voraus Gateway |
voraus-gateway |
4840 |
voraus System Control
Manages the startup of core components and provides system utile.
Environment variables
Variable |
Purpose |
Possible Value / Example |
|---|---|---|
VORAUS_SC_{component-key}_DISABLE_AUTOSTART |
Tells voraus-system-control to skip a component in the autostart config, even if it is enabled in the global system configuration. |
{True, False} |
voraus Robot Control
Controls the robot (Fieldbus communication, Motion Planning, Interpolation and OPC UA Interface).
Environment variables
Variable |
Purpose |
Possible Value / Example |
|---|---|---|
VRC_CHECK_FOR_REALTIME_KERNEL |
Check the system for a realtime environment. |
{True, False} |
VRC_ADJUST_IRQ_SETTINGS |
Sets realtime priorities for all IRQ processes of the fieldbus interface. |
{True, False} |
VRC_LOCK_MEMORY |
Lock memory on realtime system. |
{True, False} |
VRC_PREVENT_SLEEP_STATES |
Block all DMA latency enhancements. |
{True, False} |
VRC_WATCHDOG |
Monitoring of the cycle time. An error is set if the watchdog has been violated. |
{True, False} |
VRC_USE_REALTIME_ENVIRONMENT |
Deactivates all realtime settings if the value is “False”. |
{True, False} |
VRC_FIELDBUS_LOG |
Enables the fieldbus logging after an error or shutdown. |
{True, False} |
VRC_FIELDBUS_INTERFACE_NAME |
Name of the Ethernet port on the IPC to which the fildbus is connected. |
eth0 |
voraus Userapp / voraus Robot
When an application is started via the voraus.operator, an OPC UA server is started, which can be reached via port 48403, via which information such as the progress of the command is forwarded to the voraus.operator. This component is close to the end of its life and soon will be changed to the voraus Robot Arm.
voraus Error Handler
Error communication manager between core components.
voraus Operator
Browser-based user interface for robot systems.
voraus Gateway
A communication interface for voraus.operator.
voraus 3D Visu
A Python package for creating web-based 3D visualizations. More Information can be found in the component documentation: voraus 3D Visu. The voraus 3D Visu service also depends on CodeMeter, this service is explained later in this Chapter, see CodeMeter.
Component |
Component Key |
Docker Container Port |
|---|---|---|
voraus 3D Visu |
voraus-3d-visu |
80 |
Environment variables
The environment variables are defined in the documentation of the voraus 3D Visu, examples are also given.
CodeMeter
It contains all the components you need to access CodeMeter based licenses. All other services depend on CodeMeter.
Environment variables
Variable |
Purpose |
Possible Value / Example |
|---|---|---|
CM_REMOTE_SERVER |
Sets the license server host. If you use a local license, please add the following to the CodeMeter container in the compose file: extra_hosts: - host.docker.internal:host-gateway |
host.docker.internal, if you use local licenses, or IP address/hostname of your own CodeMeter license server. |
dev container
The dev container is a local development environment. As mentioned before, please refer to the voraus.pioneer Examples documentation for more information and to download the voraus.pioneer Examples, which also include Dev Container example.
The dev container is started from the named image, volumes defines that the local workspace is mounted. Command indicates that the dev container is idle in idle mode. In the environment CodeMeter is defined for license purposes, the dev container depends on all other services, therefore health checks are performed on those services.
4.2.2. Files in the Container
The following files in the Docker container of voraus.core contain additional information and data for the development. It is recommended to use persistent volumes or bind mounts for these paths to prevent data loss. The files are ordered in a Linux folder structure.
/etc/voraus - Contains the configurations for the components.
/var/log/voraus - Contains the log files.
/root/data - Contains the custom commands and user applications.
4.3. Using the External OPC UA Server
This tutorial demonstrates how to utilize the external OPC UA server in combination with a program to facilitate variable exchange between the robot and an external device (e.g., a PLC). It also covers the process of starting and stopping programs via an OPC UA communication.
Note
To follow this example the OPC UA Custom Command package is required.
Note
The variables on the external OPC UA server exist only while a program is running. Once the program execution stops, the variables are destroyed.
4.3.1. OPC UA Server Configuration
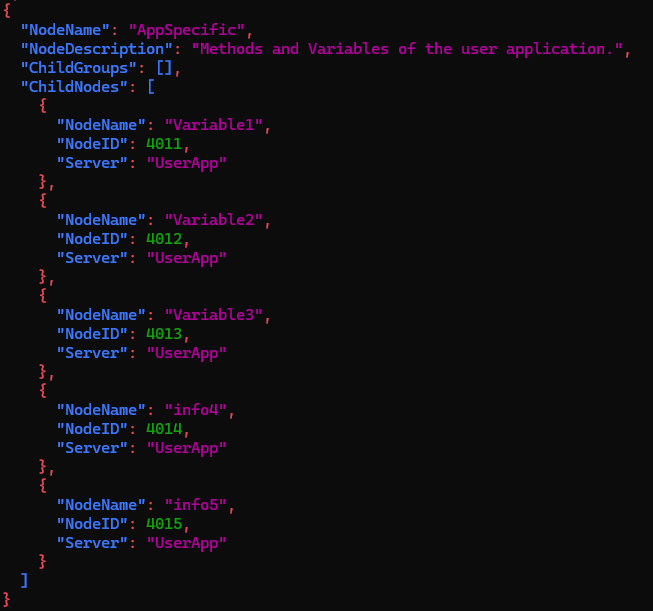
The external OPC UA server has a default configuration with five variables, which is depicted in Fig. 73. To use the server in your program, it is not required to make any changes to this configuration, and you can continue with the next section of this instruction. It is, however, possible to register additional nodes or to rename existing ones, which has no impact on the variables in your program but will be visible to other clients connected to the server.
To do this mount the file voraus-gateway/config/external-opcua.json into your host system and open it
with an editor of your choice.
Locate the node Userapp/AppSpecific and find the five default nodes named info1 to info5. Change the
names according to your needs but note that the order must match the order in which the variables are initialized in
your program (see section Set up an example program). You can add the optional attributes ReadOnly (bool)
and NodeDescription (string). The node IDs can be chosen freely as long as they are unique.
Note
The external OPC UA server is automatically started with the system. Configuration changes will be applied with the next start of the system.
4.3.2. Set up an example program
To use the external OPC UA server, either create a new program or open an existing one.
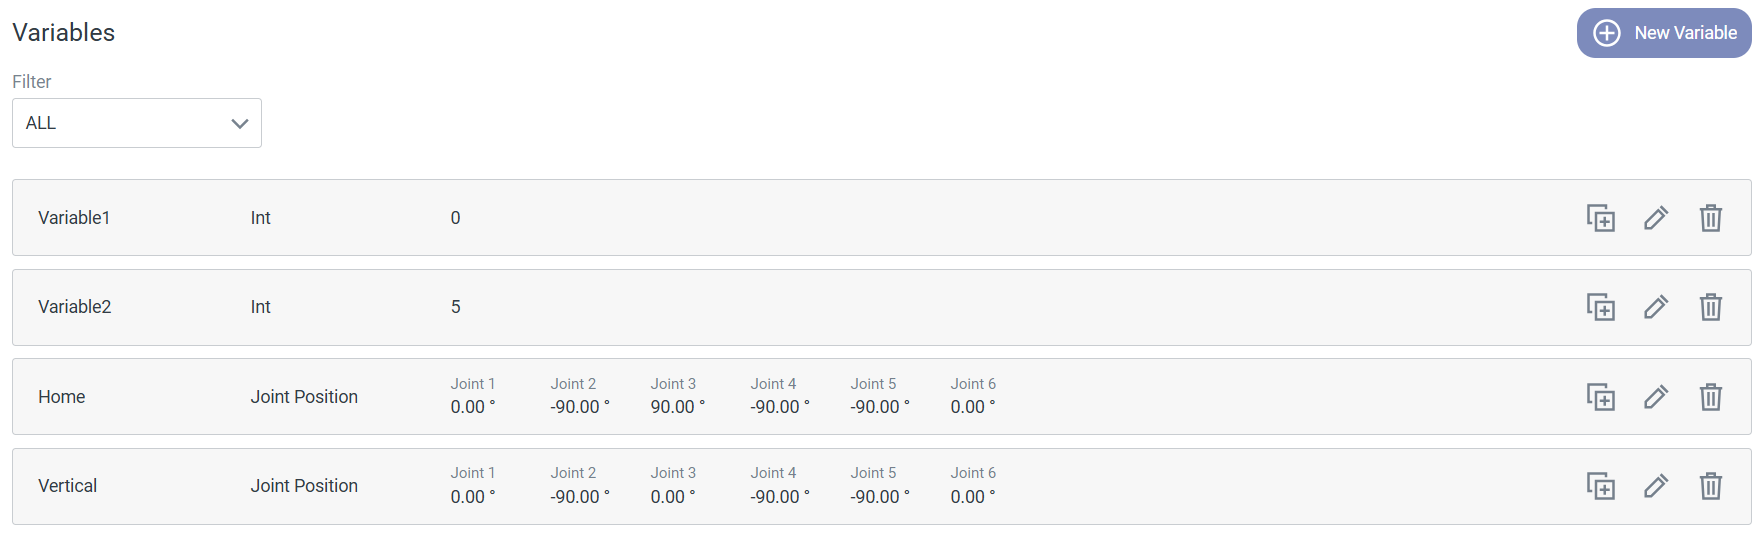
(Optional) In the Modify mode, open the Variables editor in the top-right corner and define the variables you want to transmit, as shown in Fig. 74. The supported types are integer, float, and string. Their initial value can be disregarded - this step is only for initializing the variables within the program if they are to be used with the graphical function blocks such as conditions or loops.
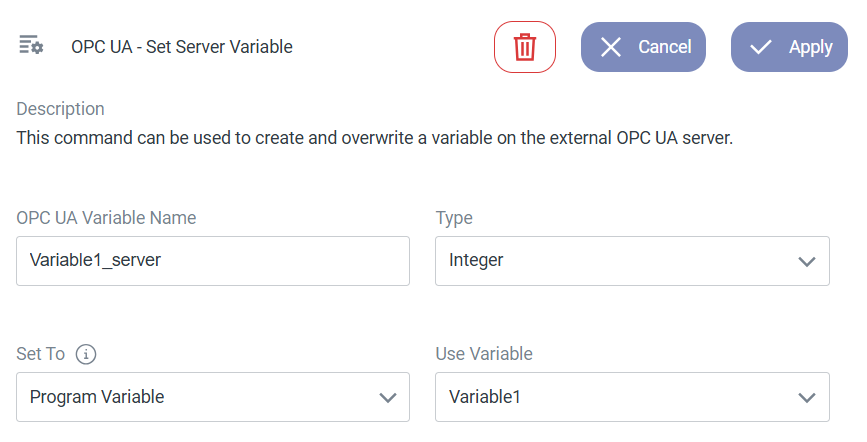
To define the program variables as OPC UA variables on the server, insert an OPC UA - Set Server Variable Custom Command for each variable at the beginning of your program. Specify the name of the variable on the server. This name does not have to match the variable name from the server configuration and will not be seen from outside the program, it is only needed for retrieving the current value via the OPC UA - Read Server Variable Custom Command later on. It can match the name in your program but does not have to. Choose the correct variable type and assign its value. You can either link it to a program variable or set a specific value directly (Fig. 75). The order in which the variables are initialized determines their order on the server, regardless of their names in the configuration file.
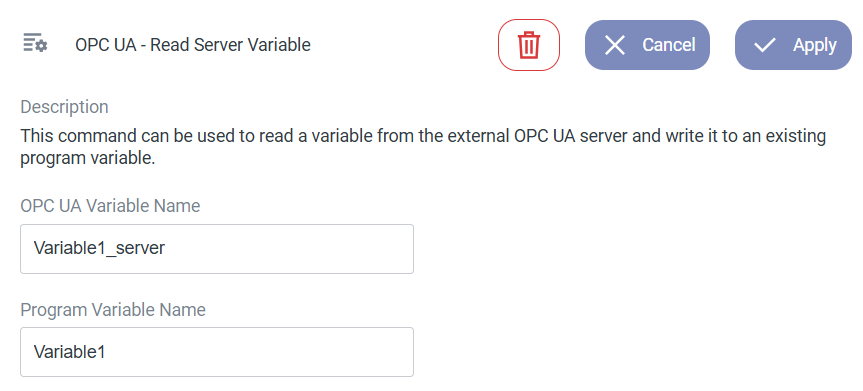
To read the current value of a variable from the server, use the OPC UA - Read Server Variable Custom Command (Fig. 76). Specify the variable’s name on the server side and the target program variable where the value will be stored.
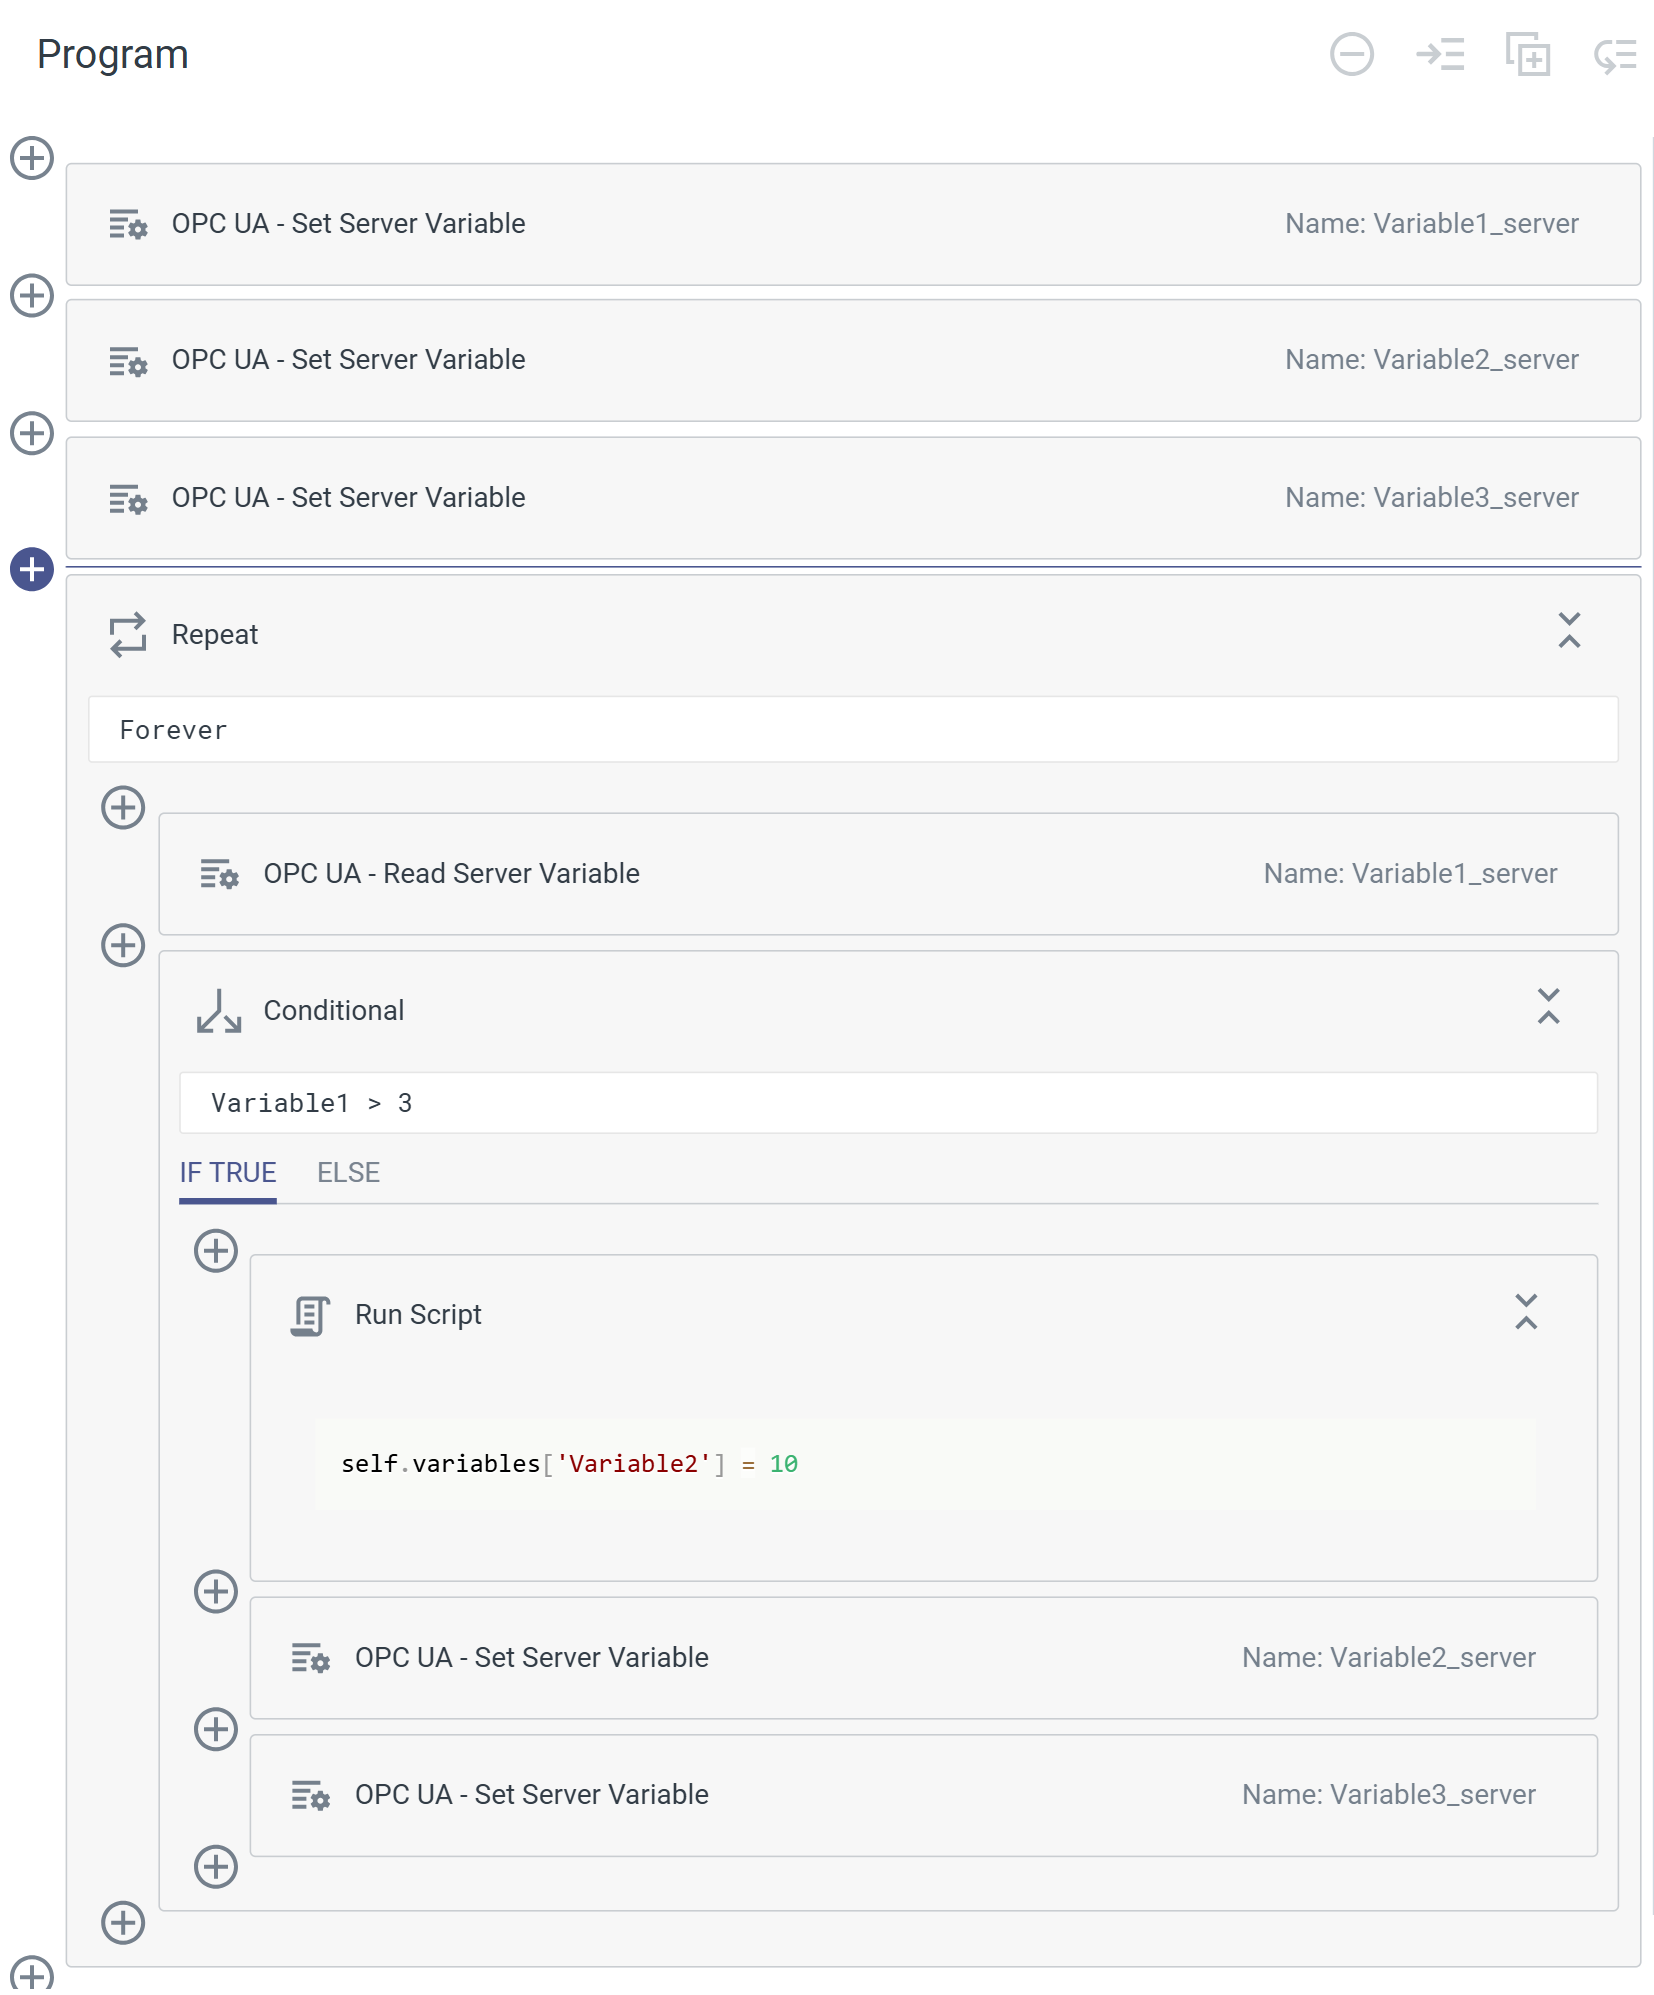
The image below (Fig. 77) illustrates an example of a program implementing cyclic OPC UA communication. At the start of the program, three variables are initialized on the server. The first two are set to the values of program variables and the third is explicitly set to 0. The main loop consists of two parts:
Reading: The value of
Variable1is read from the server and assigned to its corresponding program variable.Conditional Execution: A Conditional command determines actions based on the value of
Variable1.- If
Variable1is greater than 3: The program variable
Variable2is set to 10.The server variable
Variable2_serveris updated with the value ofVariable2.Alternatively, if the program variable is not required, the server variable (e.g.,
Variable3_server) can be directly assigned a specific value.
- If
- Else branch (not shown in the image):
Variable2_serveris set to -5.
In case you want to write the server variables with an external client you need to activate Remote Control via the status page of the HMI, see Fig. 78.

Fig. 78 Activate Remote Control to write variables on the server
4.3.3. Manual OPC UA Client - UaExpert
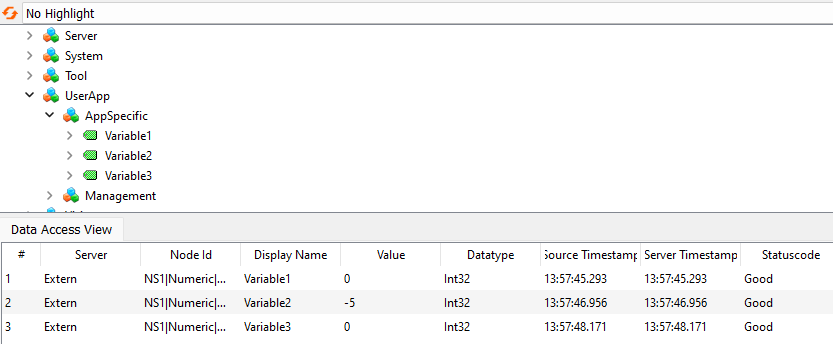
The OPC UA communication can be tested with a client such as UaExpert. Establish a connection to the external OPC UA server (opc.tcp://192.168.1.1:4840) and navigate to the node Userapp/AppSpecific. While the program is running you can see the server variables (named as in the config file). Draw them into the Data Access View to monitor their values, as seen in Fig. 79. If Remote Control is active you can also set values which will be sent to the program. Under the node Userapp/Management you can find methods to start and stop a program by its name.
4.3.4. OPC UA Client in Python
The following Python code demonstrates how to create an OPC UA client that starts a program named “External OPC
UA Server” and interacts with two nodes. It registers the node IDs, which can be customized in the configuration file on
controller 2. By default, the IDs for info1 to info5 are 304011 to 304015. The code reads the value of node2
(Variable2) and sets the value of node1 (Variable1) to 5.
  1"""Example script for using an OPC UA client directly in Python."""
  2
  3import logging
  4import time
  5from contextlib import contextmanager
  6from typing import Generator
  7
  8from asyncua.sync import Client, ua  # type: ignore
  9
 10logger = logging.getLogger(__name__)
 11
 12
 13class OpcuaPublic:
 14    """Public OPC UA client class for handling the connection and starting a program."""
 15
 16    def __init__(self, url: str):
 17        """Initialize the OPC UA client parameters.
 18
 19        Args:
 20            url: URL for the OPC UA client in the style of opc.tcp://<IP_ADDRESS>:<PORT>
 21        """
 22        self.url = url
 23        self._client: Client | None = None
 24
 25    @property
 26    def client(self) -> Client:
 27        """Makes sure client is not None.
 28
 29        Returns:
 30            The OPC UA client.
 31        """
 32        assert self._client is not None, "OPC UA client not connected."
 33        return self._client
 34
 35    @contextmanager
 36    def open_connection(self) -> Generator[None, None, None]:
 37        """Manage the OPC UA connection.
 38
 39        Yields:
 40            None: Allows code execution within the context block while
 41            ensuring the OPC UA connection is properly opened and closed.
 42        """
 43        with Client(self.url) as public_client:
 44            self._client = public_client
 45            yield
 46
 47    def start_program(self, program_name: str) -> None:
 48        """Starts the given program.
 49
 50        Args:
 51            program_name: Name of the program, [syntax: program_'name of your program'.py].
 52
 53        Raises:
 54            RuntimeError: If the program cannot be started.
 55        """
 56        try:
 57            with self.open_connection():
 58                management = self.client.get_node("ns=1;i=107")
 59                start_user_app = self.client.get_node("ns=1;i=9010067")
 60                management.call_method(
 61                    start_user_app,
 62                    ua.Variant(program_name, ua.VariantType.String),
 63                    ua.Variant(0, ua.VariantType.UInt32),
 64                )
 65        except ua.UaError as e:
 66            msg = "Failed to start the program!"
 67            raise RuntimeError(msg) from e
 68
 69    def stop_program(self) -> None:
 70        """Stops the current program.
 71
 72        Raises:
 73            RuntimeError: If the program cannot be stopped.
 74        """
 75        try:
 76            with self.open_connection():
 77                management = self.client.get_node("ns=1;i=107")
 78                stop_user_app = self.client.get_node("ns=1;i=9010068")
 79                management.call_method(stop_user_app)
 80        except ua.UaError as e:
 81            msg = "Failed to stop the program!"
 82            raise RuntimeError(msg) from e
 83
 84
 85if __name__ == "__main__":
 86    OPCUA_CLIENT_URL = "opc.tcp://192.168.1.1:4840"
 87    robot = OpcuaPublic(OPCUA_CLIENT_URL)
 88
 89    robot.start_program("program_external_opc_ua_server.py")
 90    time.sleep(2)
 91
 92    with robot.open_connection():
 93        try:
 94            node1 = robot.client.get_node("ns=1;i=304011")
 95            node2 = robot.client.get_node("ns=1; i=304012")
 96            val = node2.get_value()
 97            data_value = ua.DataValue(ua.Variant(5, ua.VariantType.Int32))
 98            node1.set_value(data_value)
 99            logger.info(f"Variable: {val}")
100        except ua.UaError as e:
101            logging.exception(f"An Exception was thrown!: {e}")
102
103    robot.stop_program()